The Dronecode Foundation is a non-profit organisation for open source drone projects. It is part of Linux Foundation with a focus primarily on open source software and hardware (PX4 autopilot, MAVLink, MAVSDK, and QGroundControl), governance, and infrastructure.
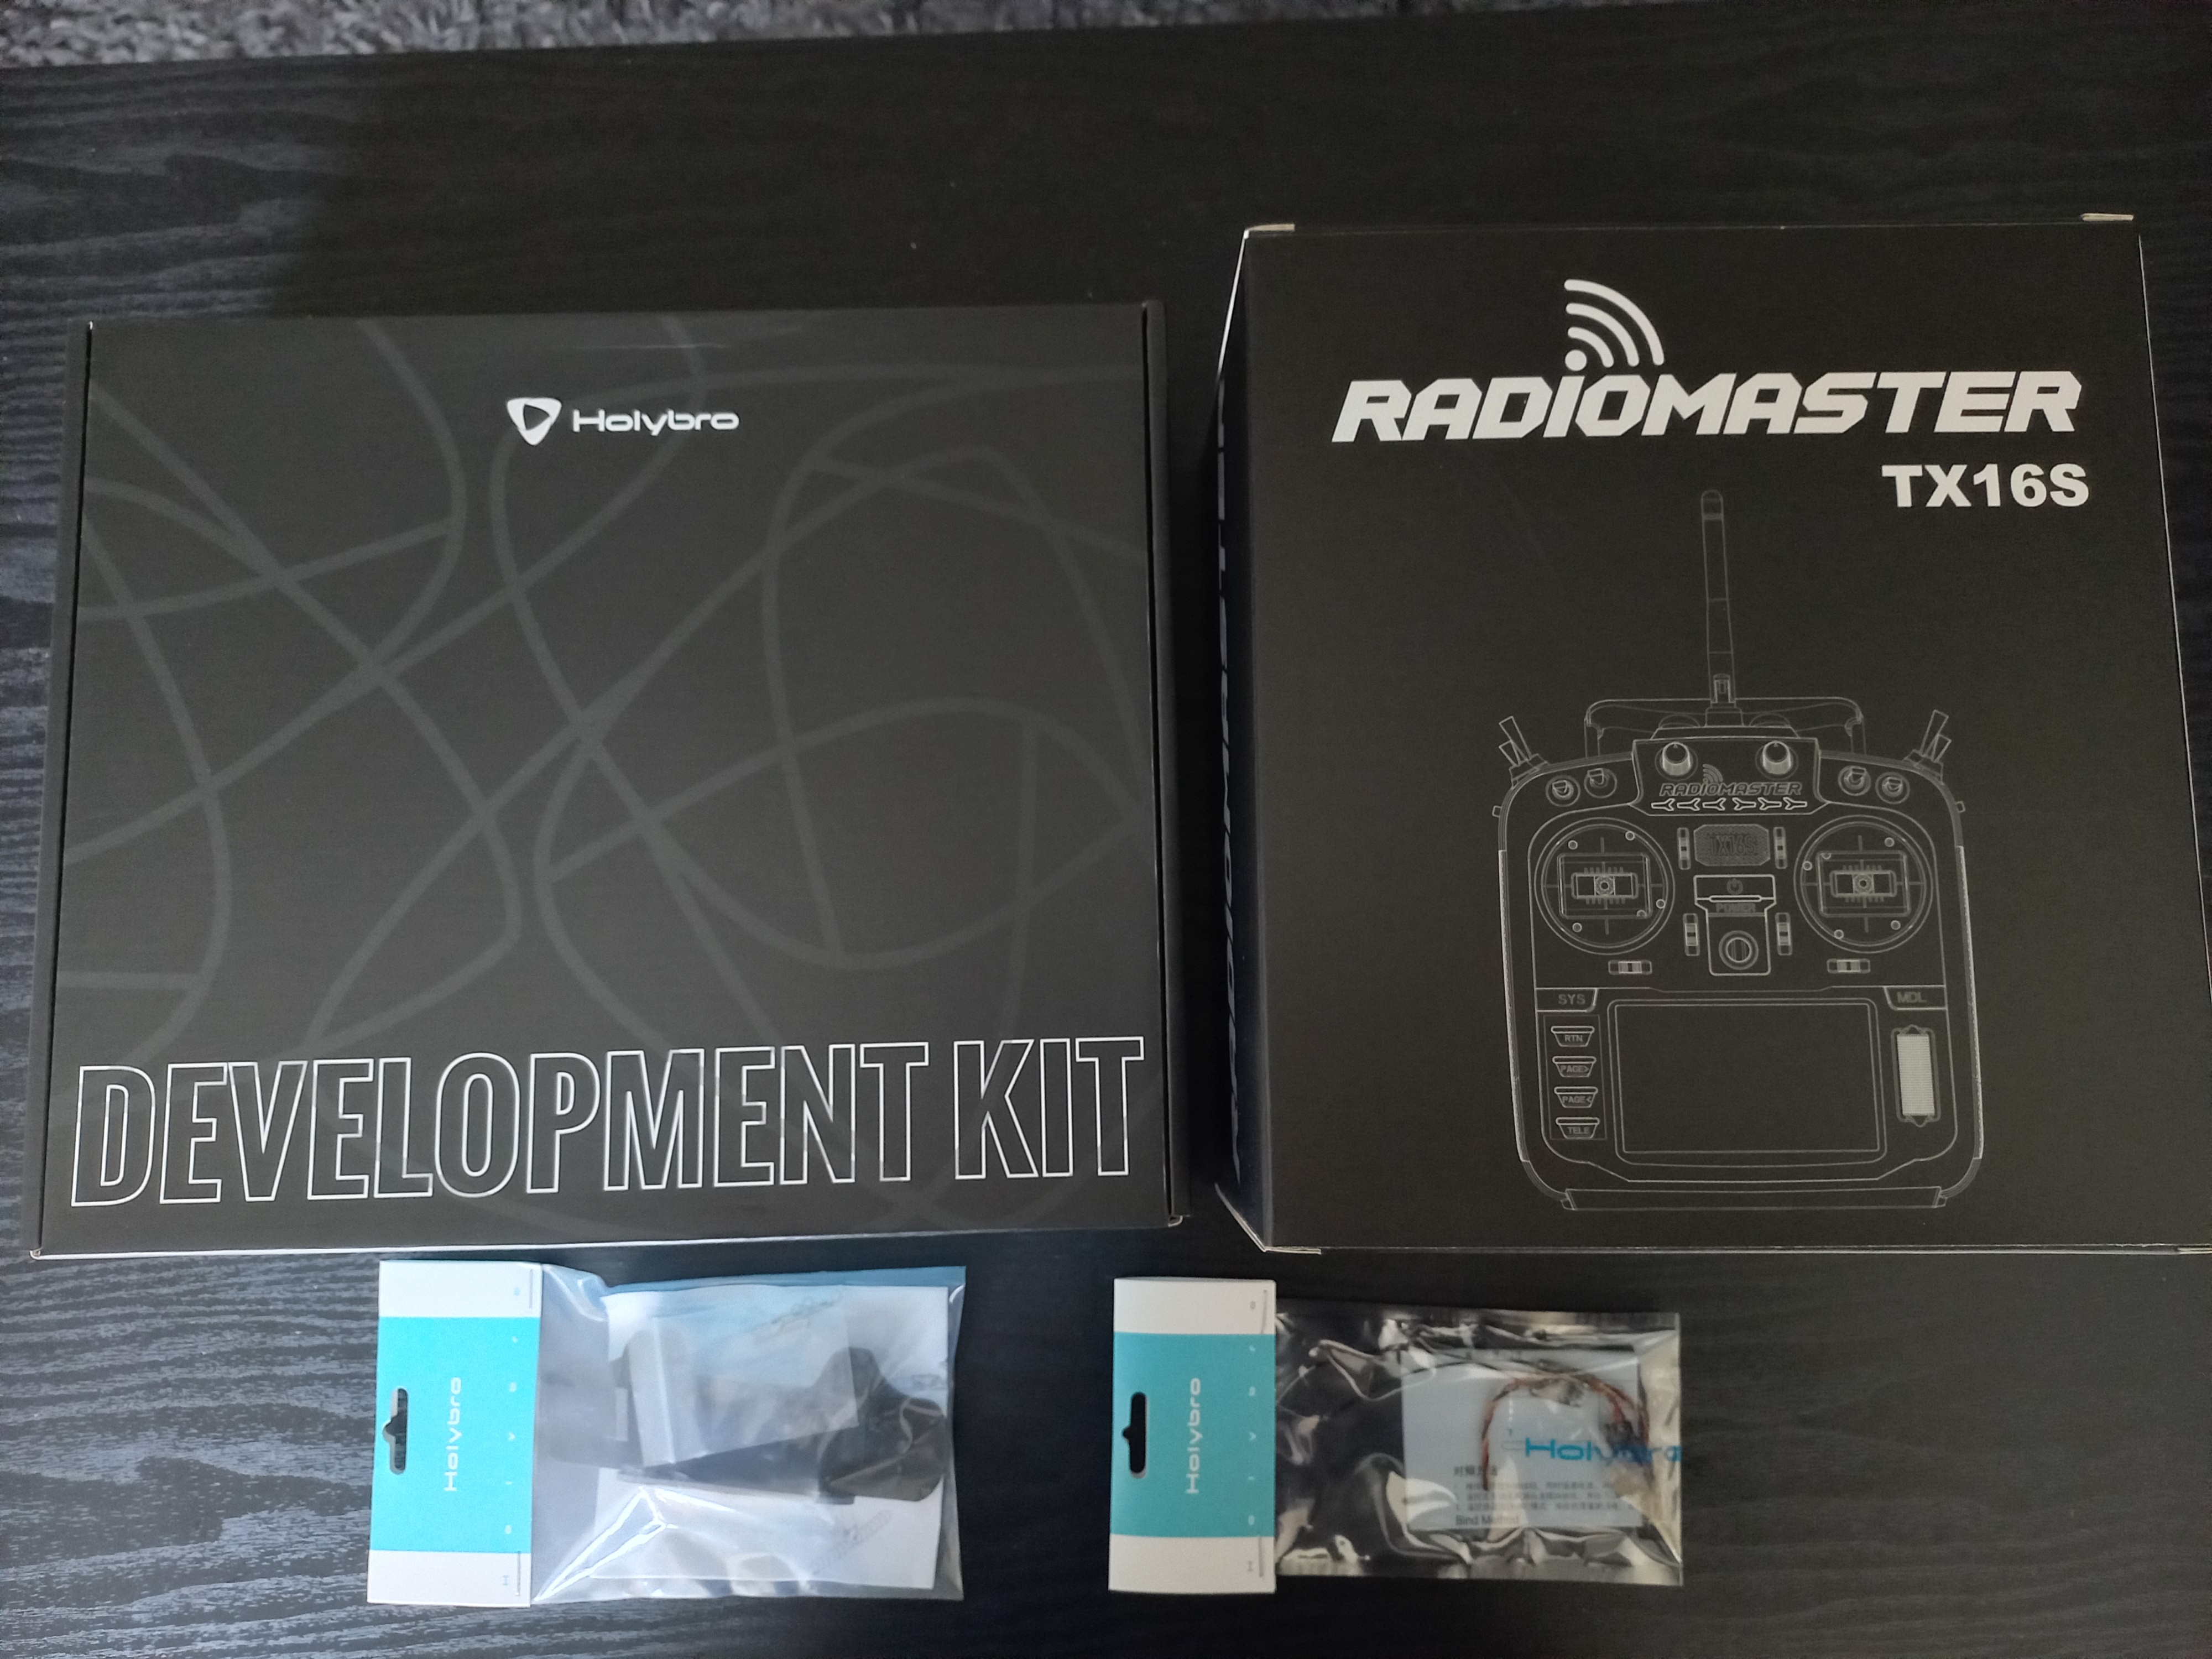
Getting started with open source drone development is relatively straightforward thanks to the Dronecode community and broader ecosystem. The X500 v2 PX4 development kit, sold by Holybro, is a popular research drone platform that supports the open source PX4 autopilot flight stack. The platform includes all the basic sensors required for stabilisation and autonomous control (gyroscope, magnetometer/compass, accelerometer, barometer, and GPS).

If you have never used a quadcopter before, be prepared for a steep learning curve and possibly a little frustration along the way. This article outlines how to quickly get started with the PX4 X500 v2 development kit and RadioMaster TX16S multi protocol radio system setup. Thereafter more complex topics such as autonomous flight and simulation can be tackled.
Radio frequency selection
The RC transmitter is used to communicate with the quadcopter via radio signals. The frequency bands allowed for hobby use are generally regulated worldwide to ensure that the signals do not interfere with other important radio signals in the environment.
Most countries have laws which outline the acceptable radio frequency for drone hobby use. In South Africa this is governed by the National Radio Frequency Plan document from the Independent Communications Authority of South Africa. In general, use 915 MHz in the USA and 433 MHz in Africa, Europe, Oceania, and most of Asia. Make sure to select the correct frequency when ordering the telemetry radio.
Assembling the kit
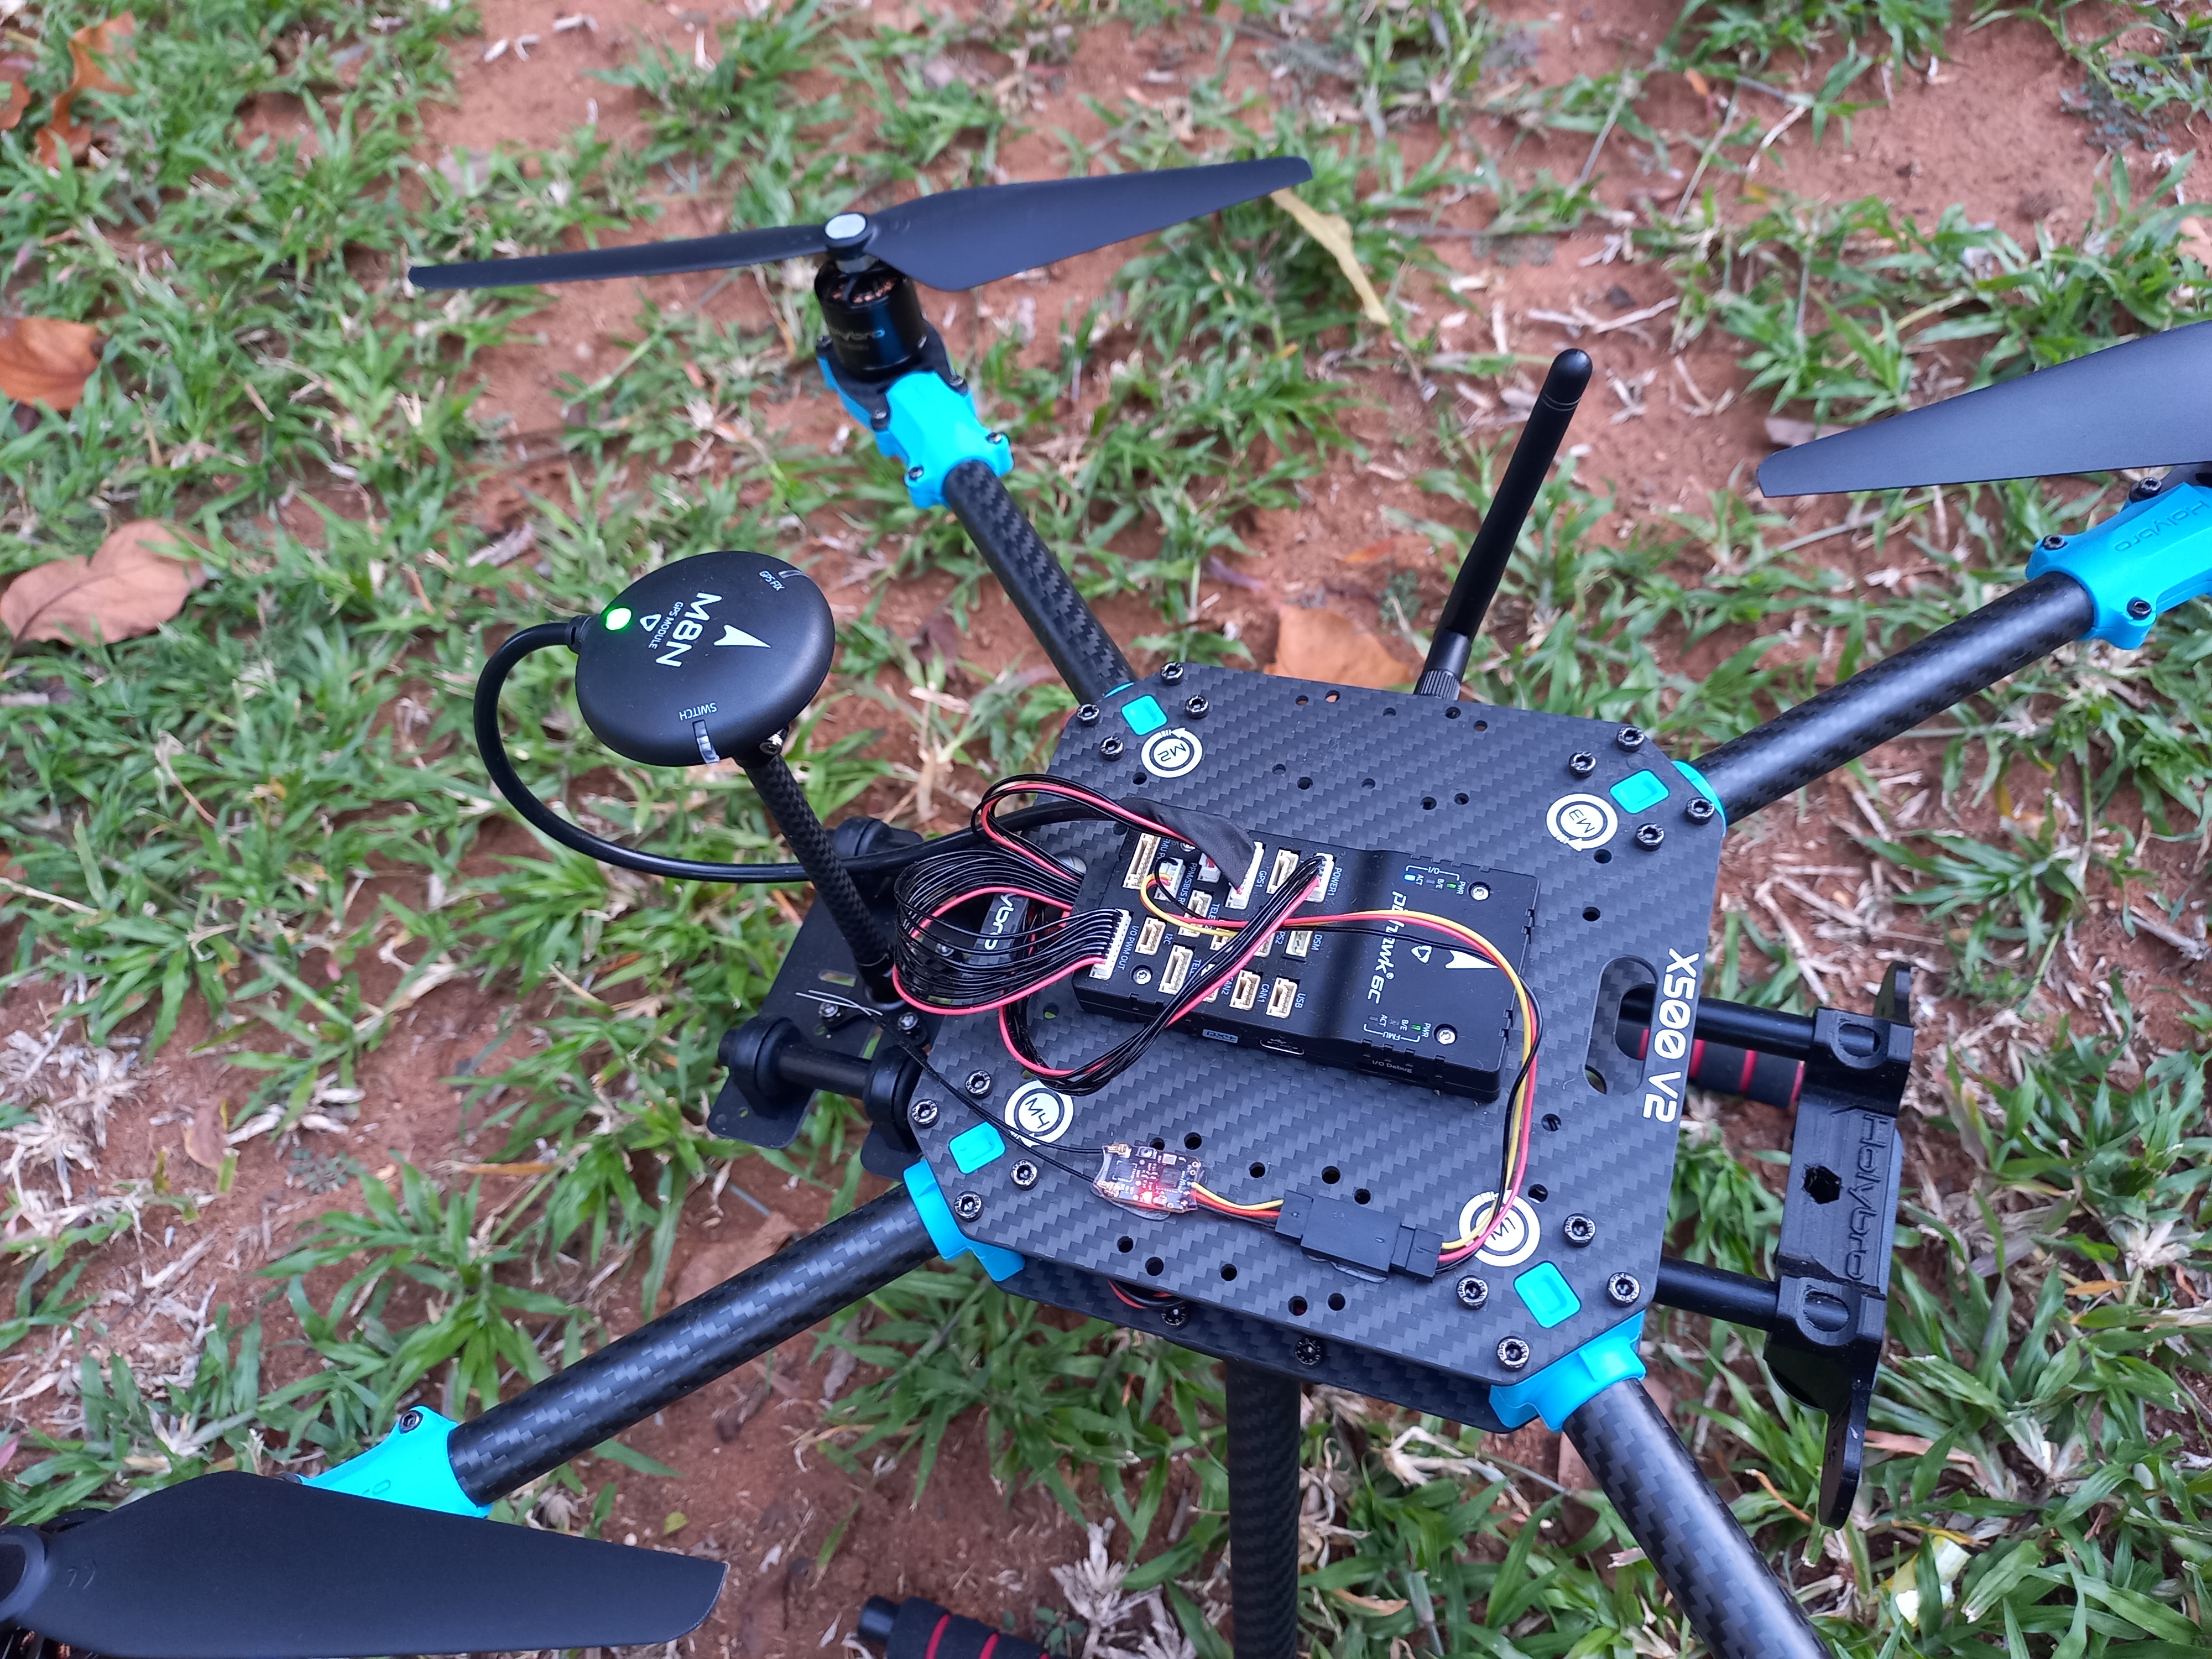
The development kit (including a Pixhawk 6C flight controller, RC transmitter/receiver pair, GPS module, and a camera mount) ships in a well packaged box with a fair amount of buffer material for rough handling.
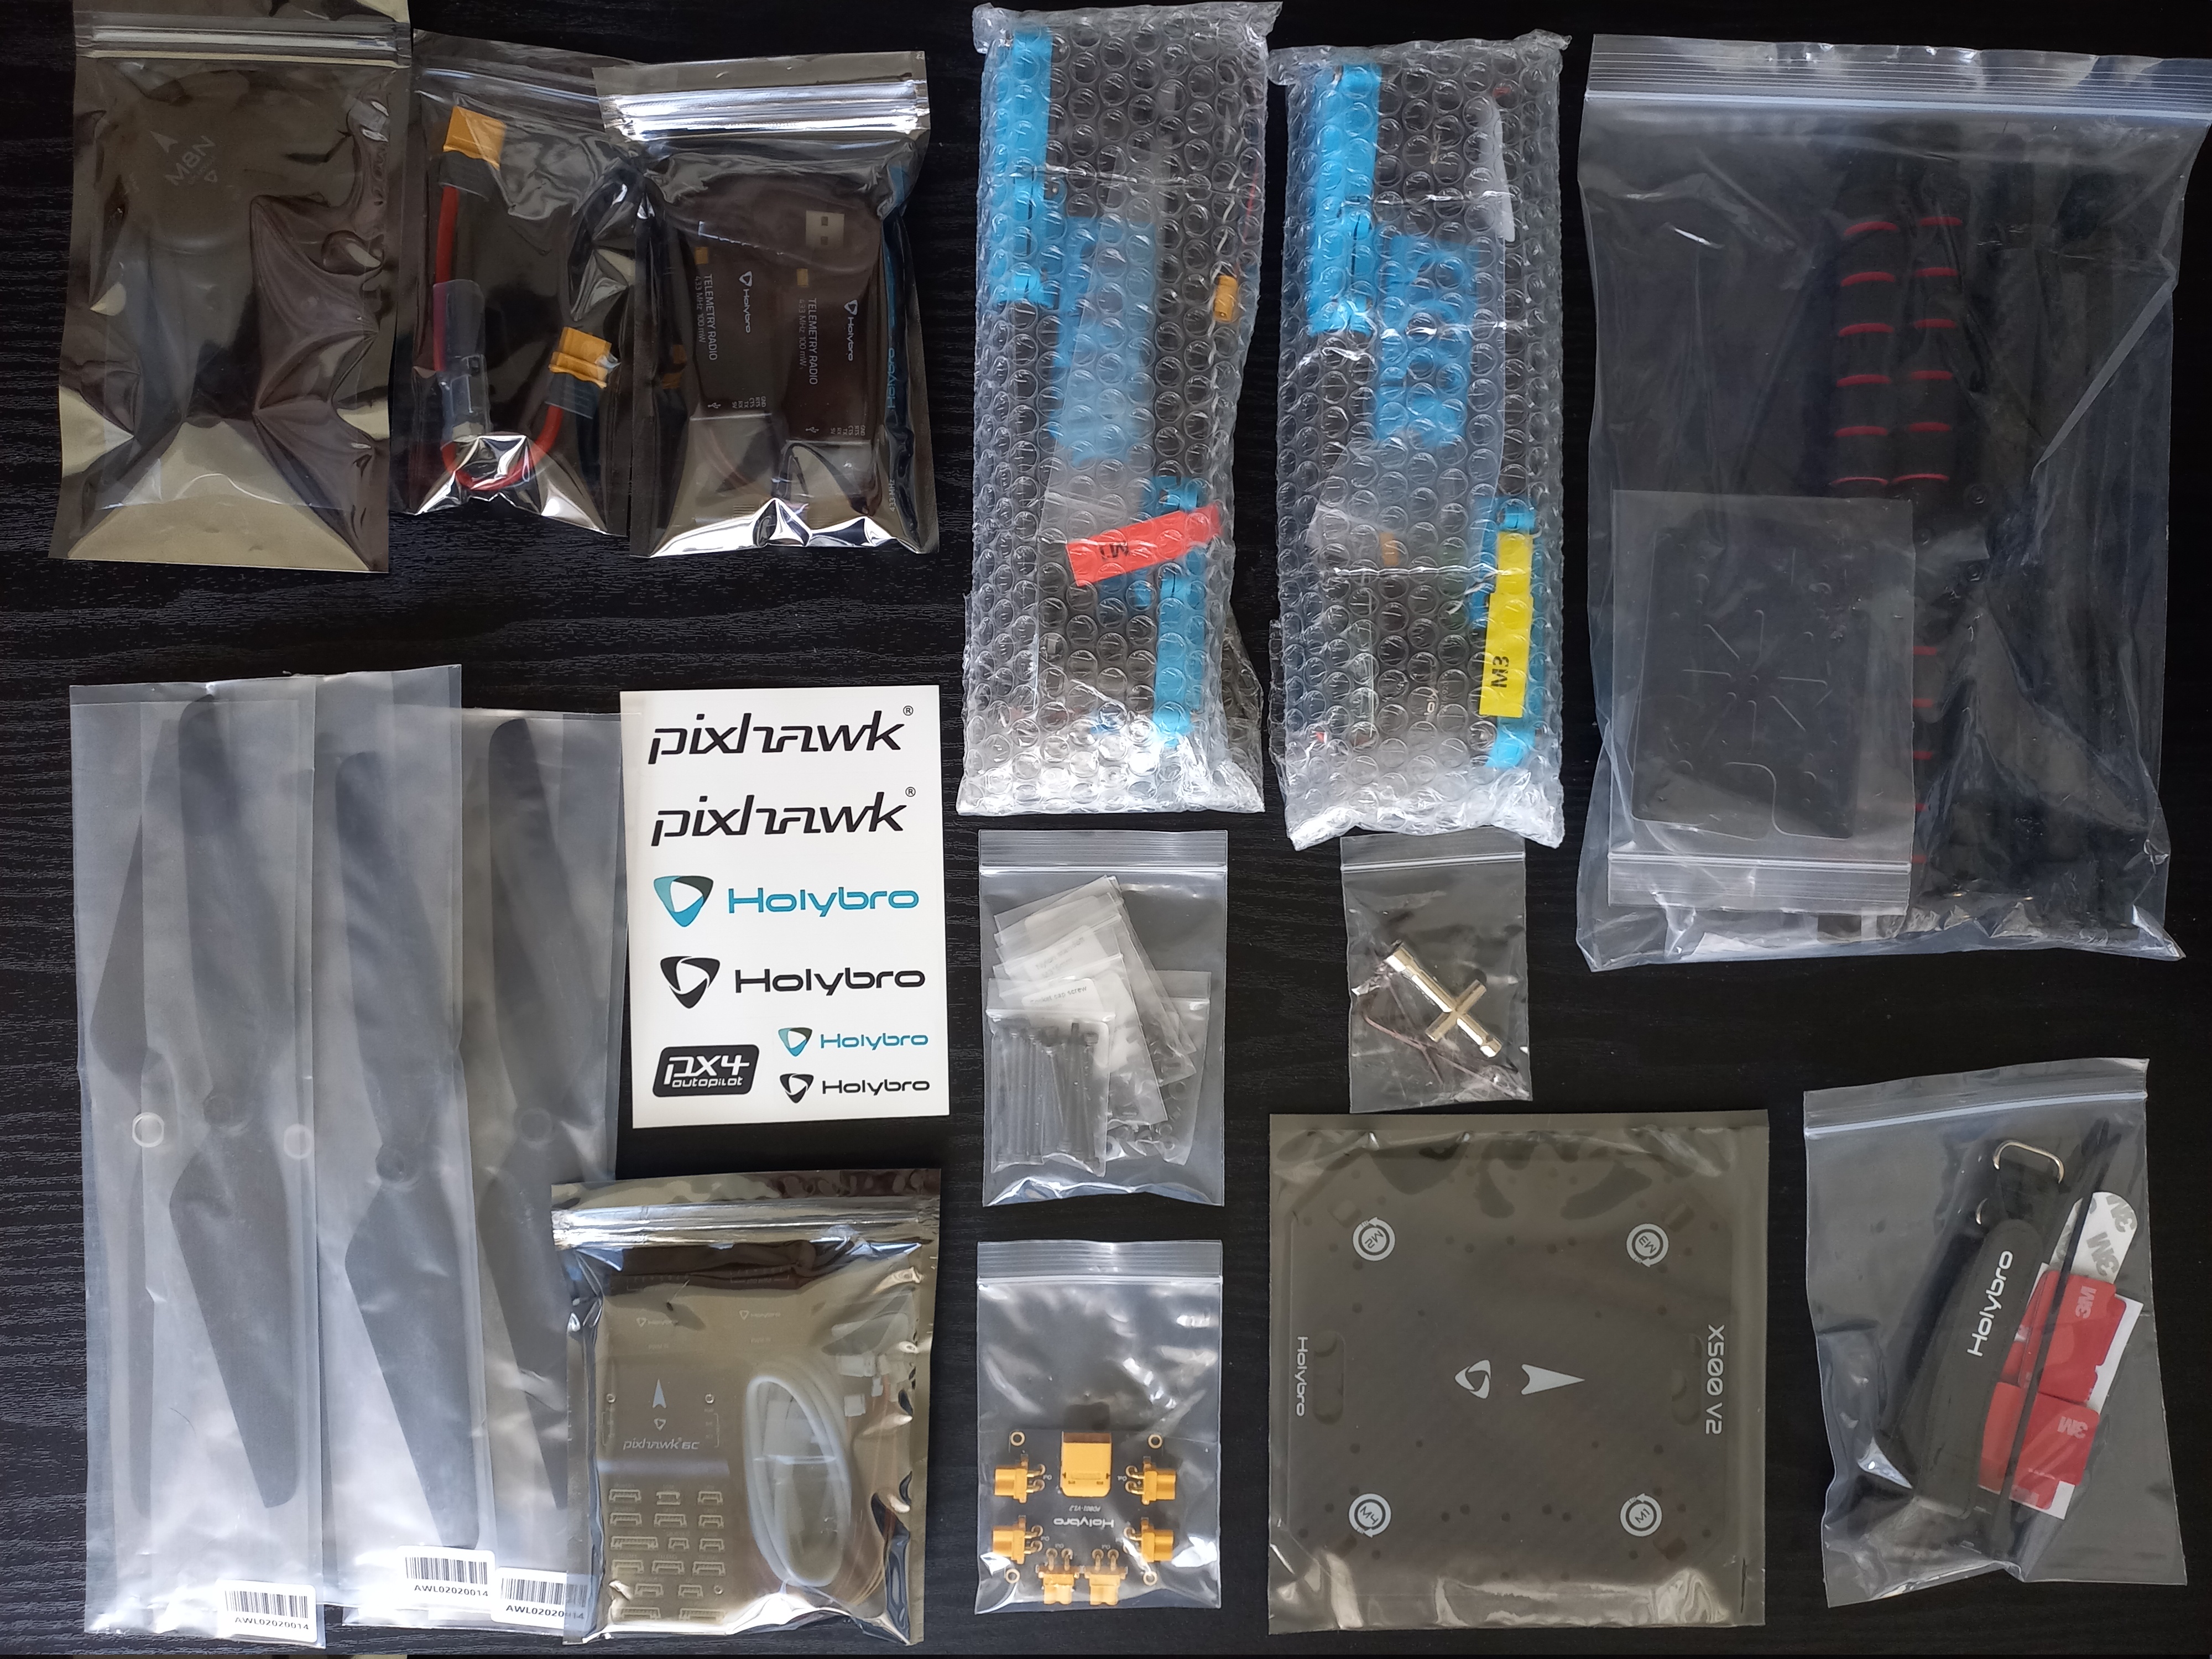
The instructions in the box are straightforward but there are some potential pitfalls to be aware of:
- Make sure that the power board is facing the correct way (with the large connector facing in the backward direction)
- The ESC connectors coming from the motors are color-coded and should be inserted in the PWM OUT ports such that the white cable faces up
- Use the 3M double sided tape to secure the telemetry board and PWM motor board to the underside of the top plate before connecting the arms
- Make sure that the arrows shown on the top plate, GPS module, and Pixhawk 6C all face in the same (forward) direction
- Mount the RC receiver (using double sided tape) on the top plate
This user contributed video provides a nice overview of the build process and is worth watching before getting started. Also check out the airframe build guide for PX4 X500 V2 for further insights.
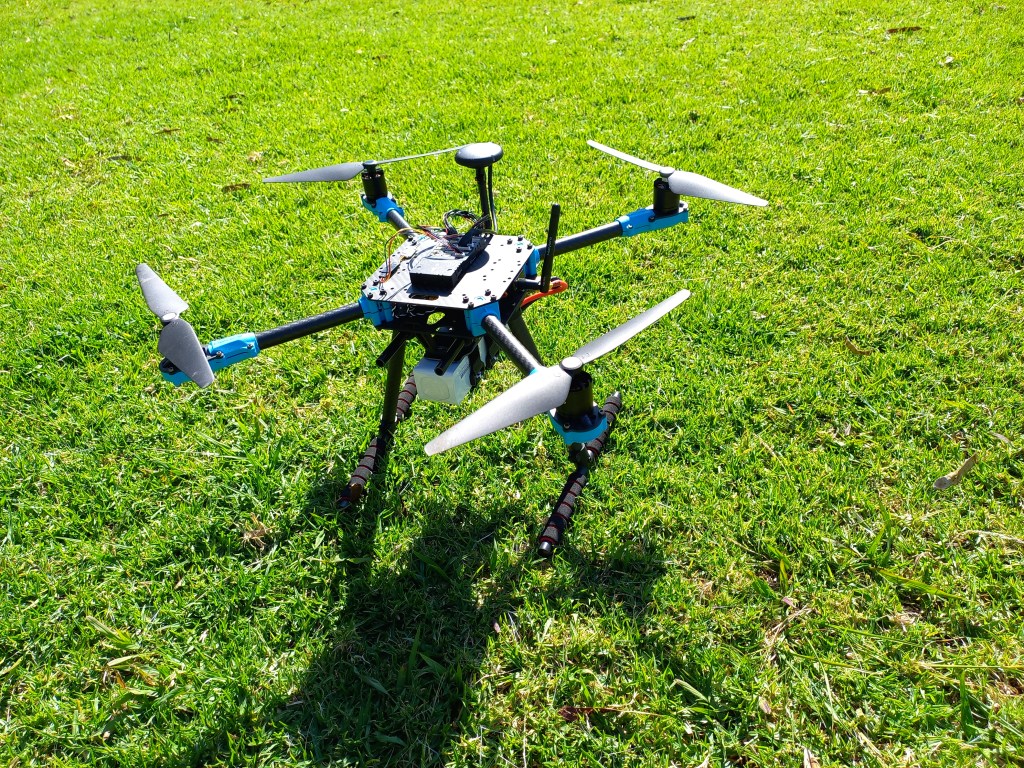
Once assembled (excluding propellers) the kit should look like the last image below.


LiPo battery selection
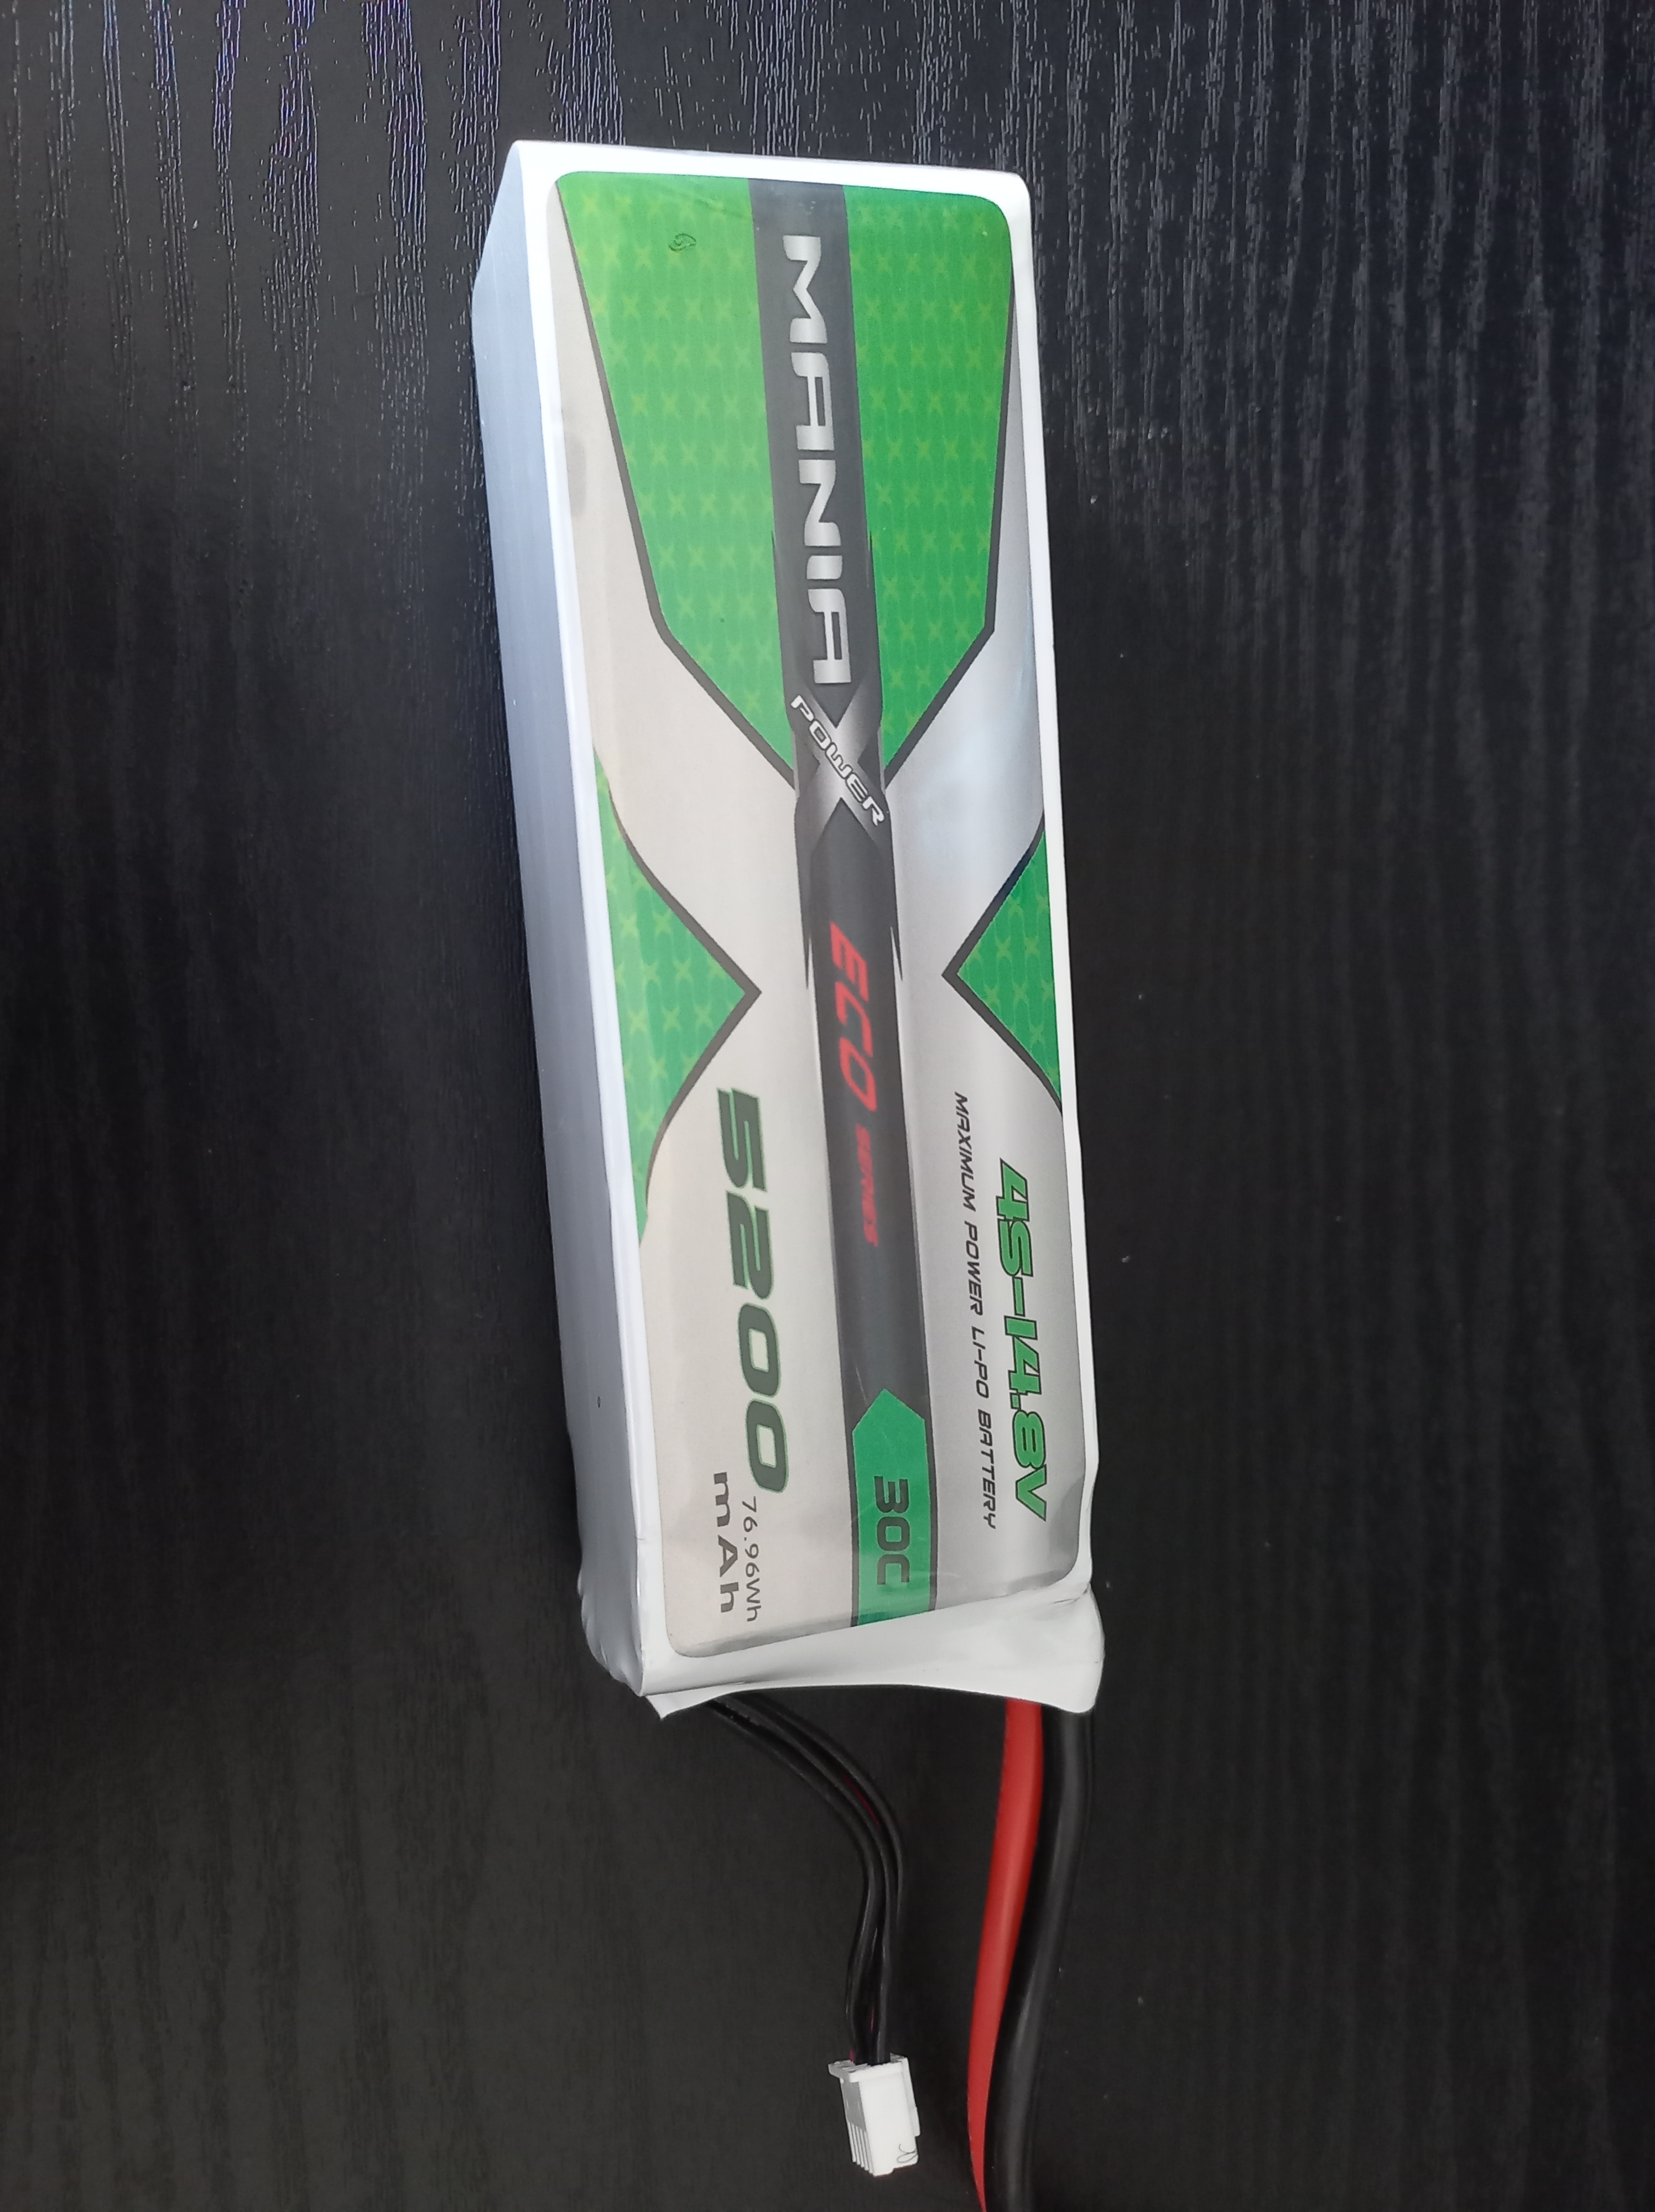
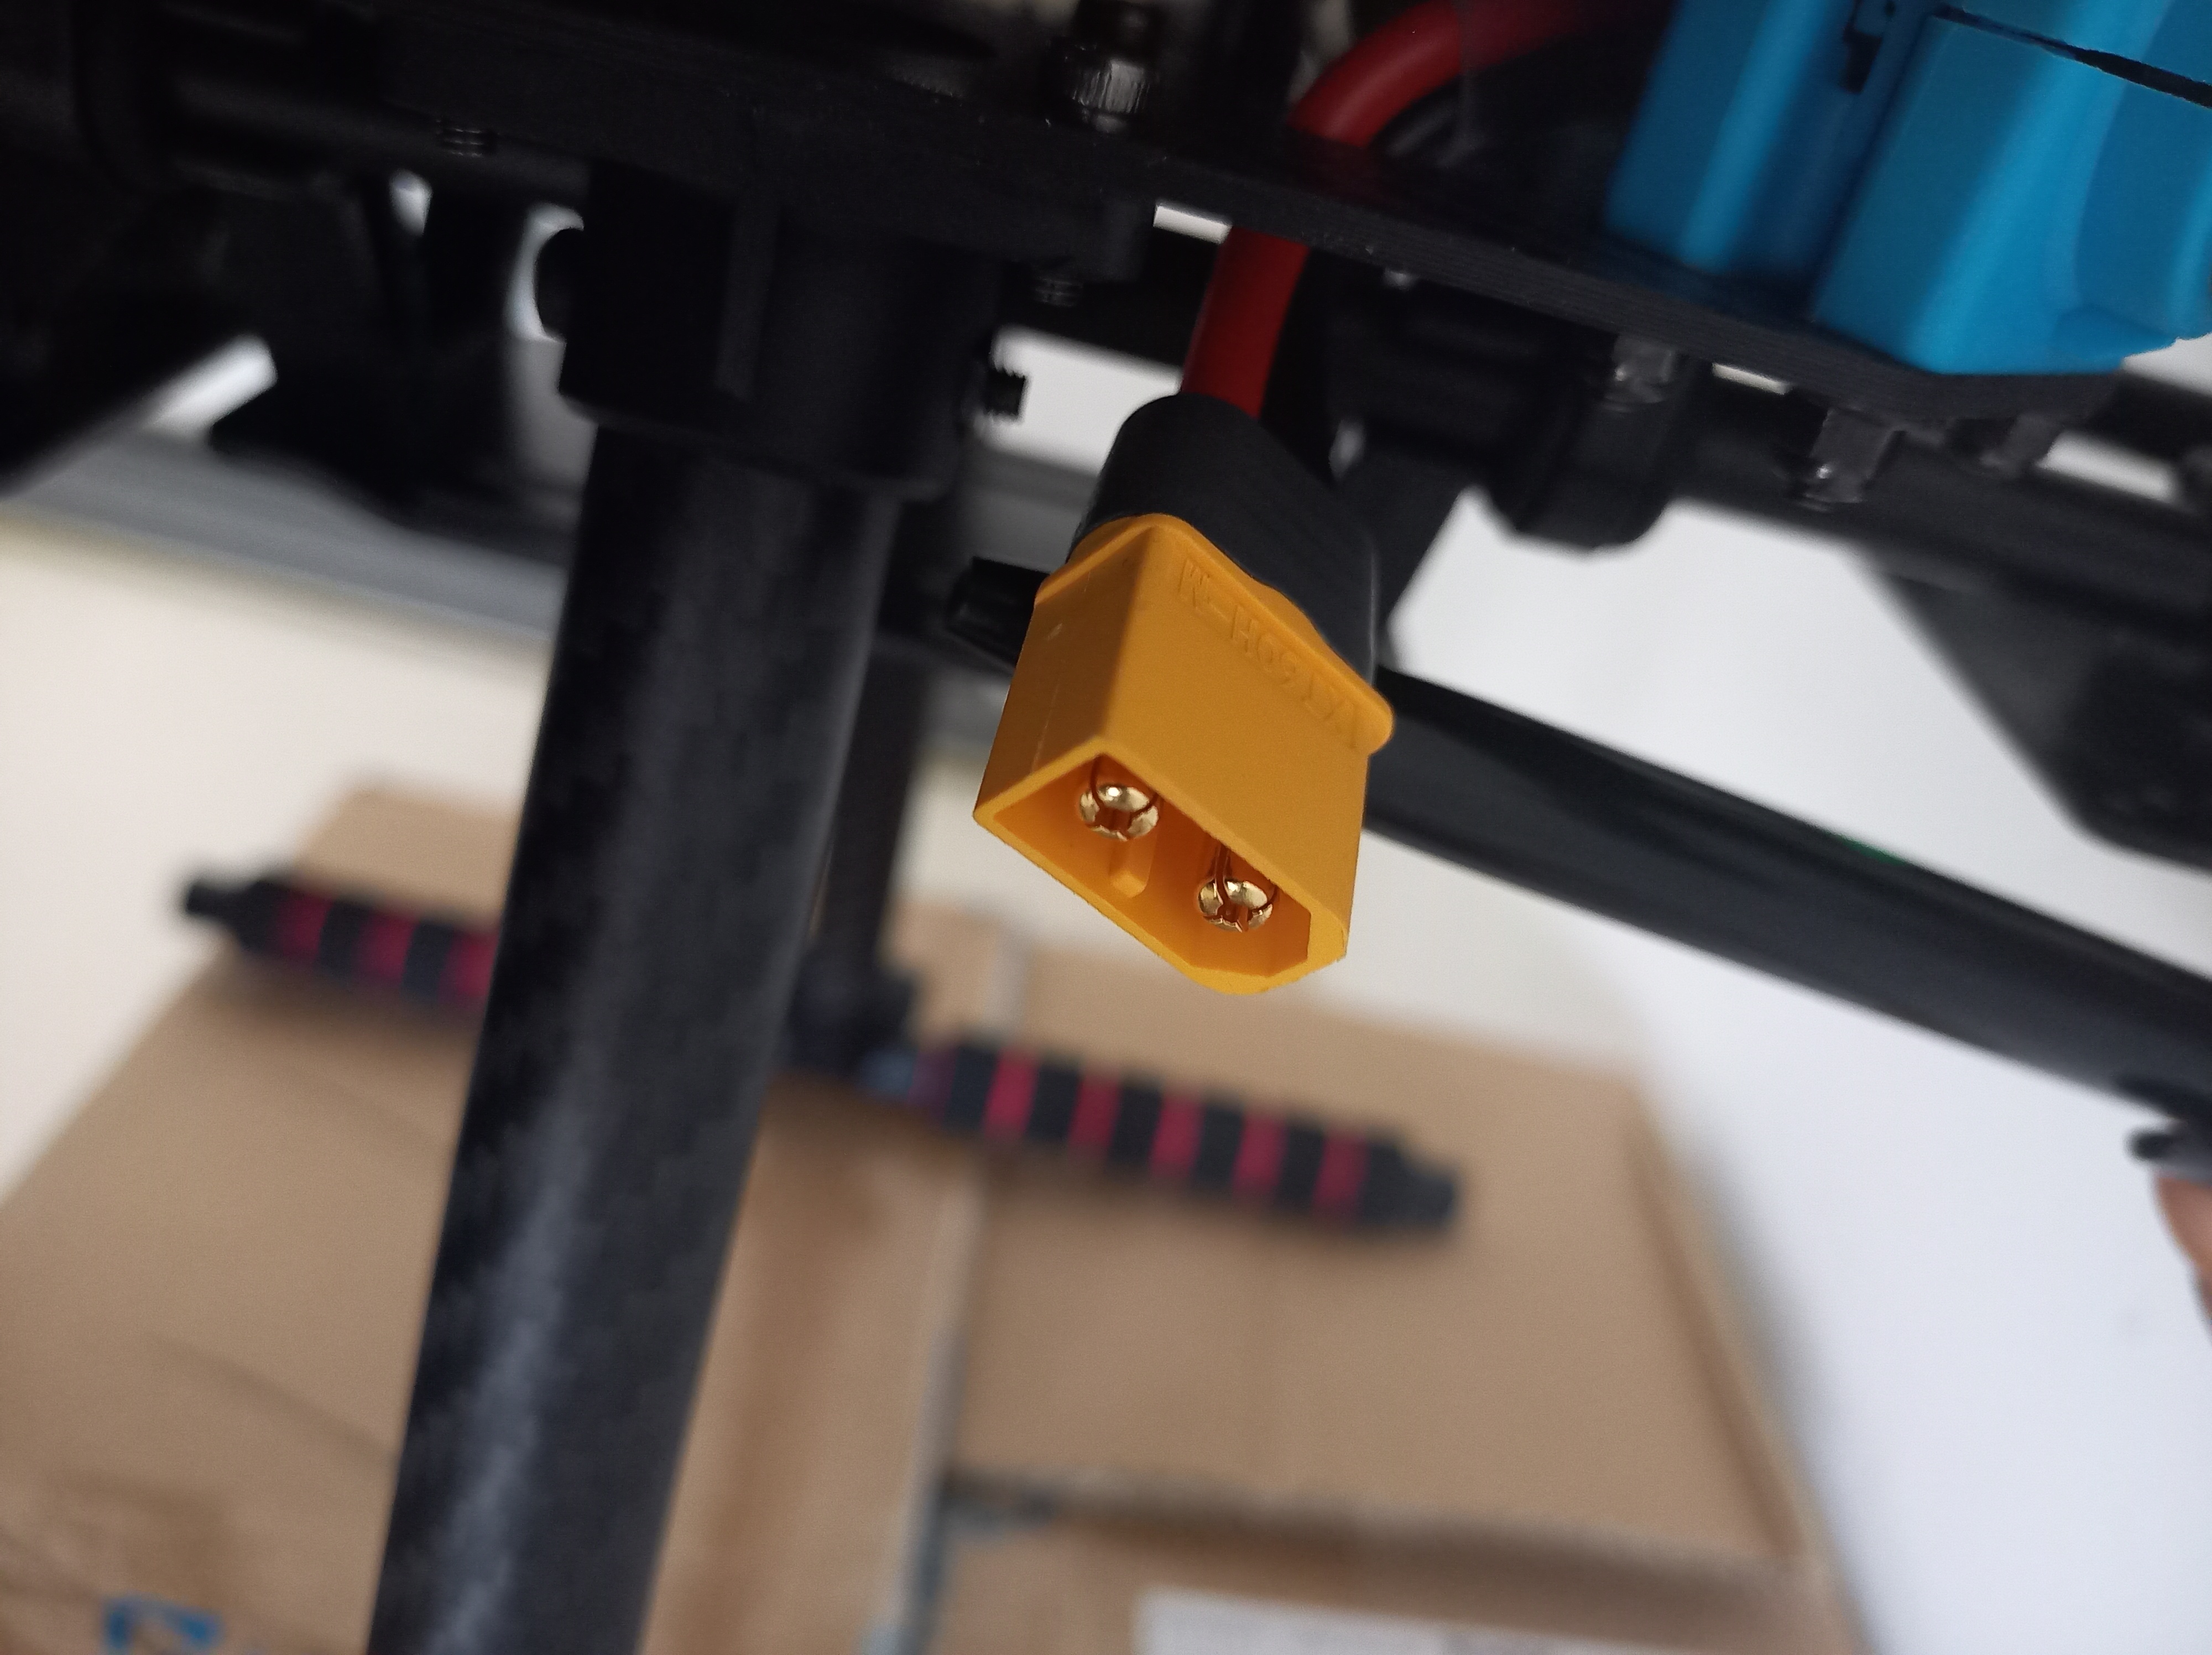
Lithium polymer (LiPo) batteries are popular choices for RC cars and drones. The Holybro PX4 development kit requires 4S LiPo batteries with capacity between 2000-5000mAh and a XT60 connector. LiPo batteries comprise of multiple cells, each cell having a nominal voltage of 3.7V. The PX4 quadcopter kit therefore uses a 4×3.7V = 14.8V 4 cell (4S) battery.
The capacity describes the charge retention ability of the battery. For example, connecting a 10A load to a 5000mAh battery means that the battery would take 30 minutes to fully discharge (i.e. (5000mAh/1000)/10A = 1/2 h). In reality however, the flight time afforded by a battery depends on environmental conditions like how fast you fly, the battery condition, and the payload weight. This article provides a good beginner’s guide to LiPo batteries. Battery capacity also affects the thickness of the battery pack. Using a 5200mAh 14.8V 4S 30C battery requires 220mm long velcro battery straps (the kit comes with shorter 200mm battery straps).
Charging the battery requires a specialised charger that has a balance charging function. Each cell is balance charged to 4.2V so a full battery will measure 16.8V. Never leave batteries charging alone, it’s better to charge them outside if possible and inside a LiPo Guard fireproof bag as shown in the left image below. The XT60 connector (see right image below) is less popular than the Deans connector so sourcing a battery can be challenging.

The RadioMaster TX16S supports multiple battery types (see the manual for details). I use a 2S 1550mAh 45C LiPo battery (the capacity is too low and not ideal for long flights). When balance charging this battery, select the next option up for capacity (eg. 1600mAh if the option for 1550mAh is not available). Alternatively, charge the battery directly via the USB charge port on the RadioMaster TX16S. When testing the USB charging option, the battery did not charge to full capacity.
LiPo batteries should be storage charged when not in use for extended periods, for example if you’re working in simulation for a few weeks or perhaps going away on holiday. Storage charging the battery prolongs battery life.
Radio Control (RC)
The initial setup of the RadioMaster TX16S transmitter is covered in this video and the follow up on setting global functions (shortcuts).
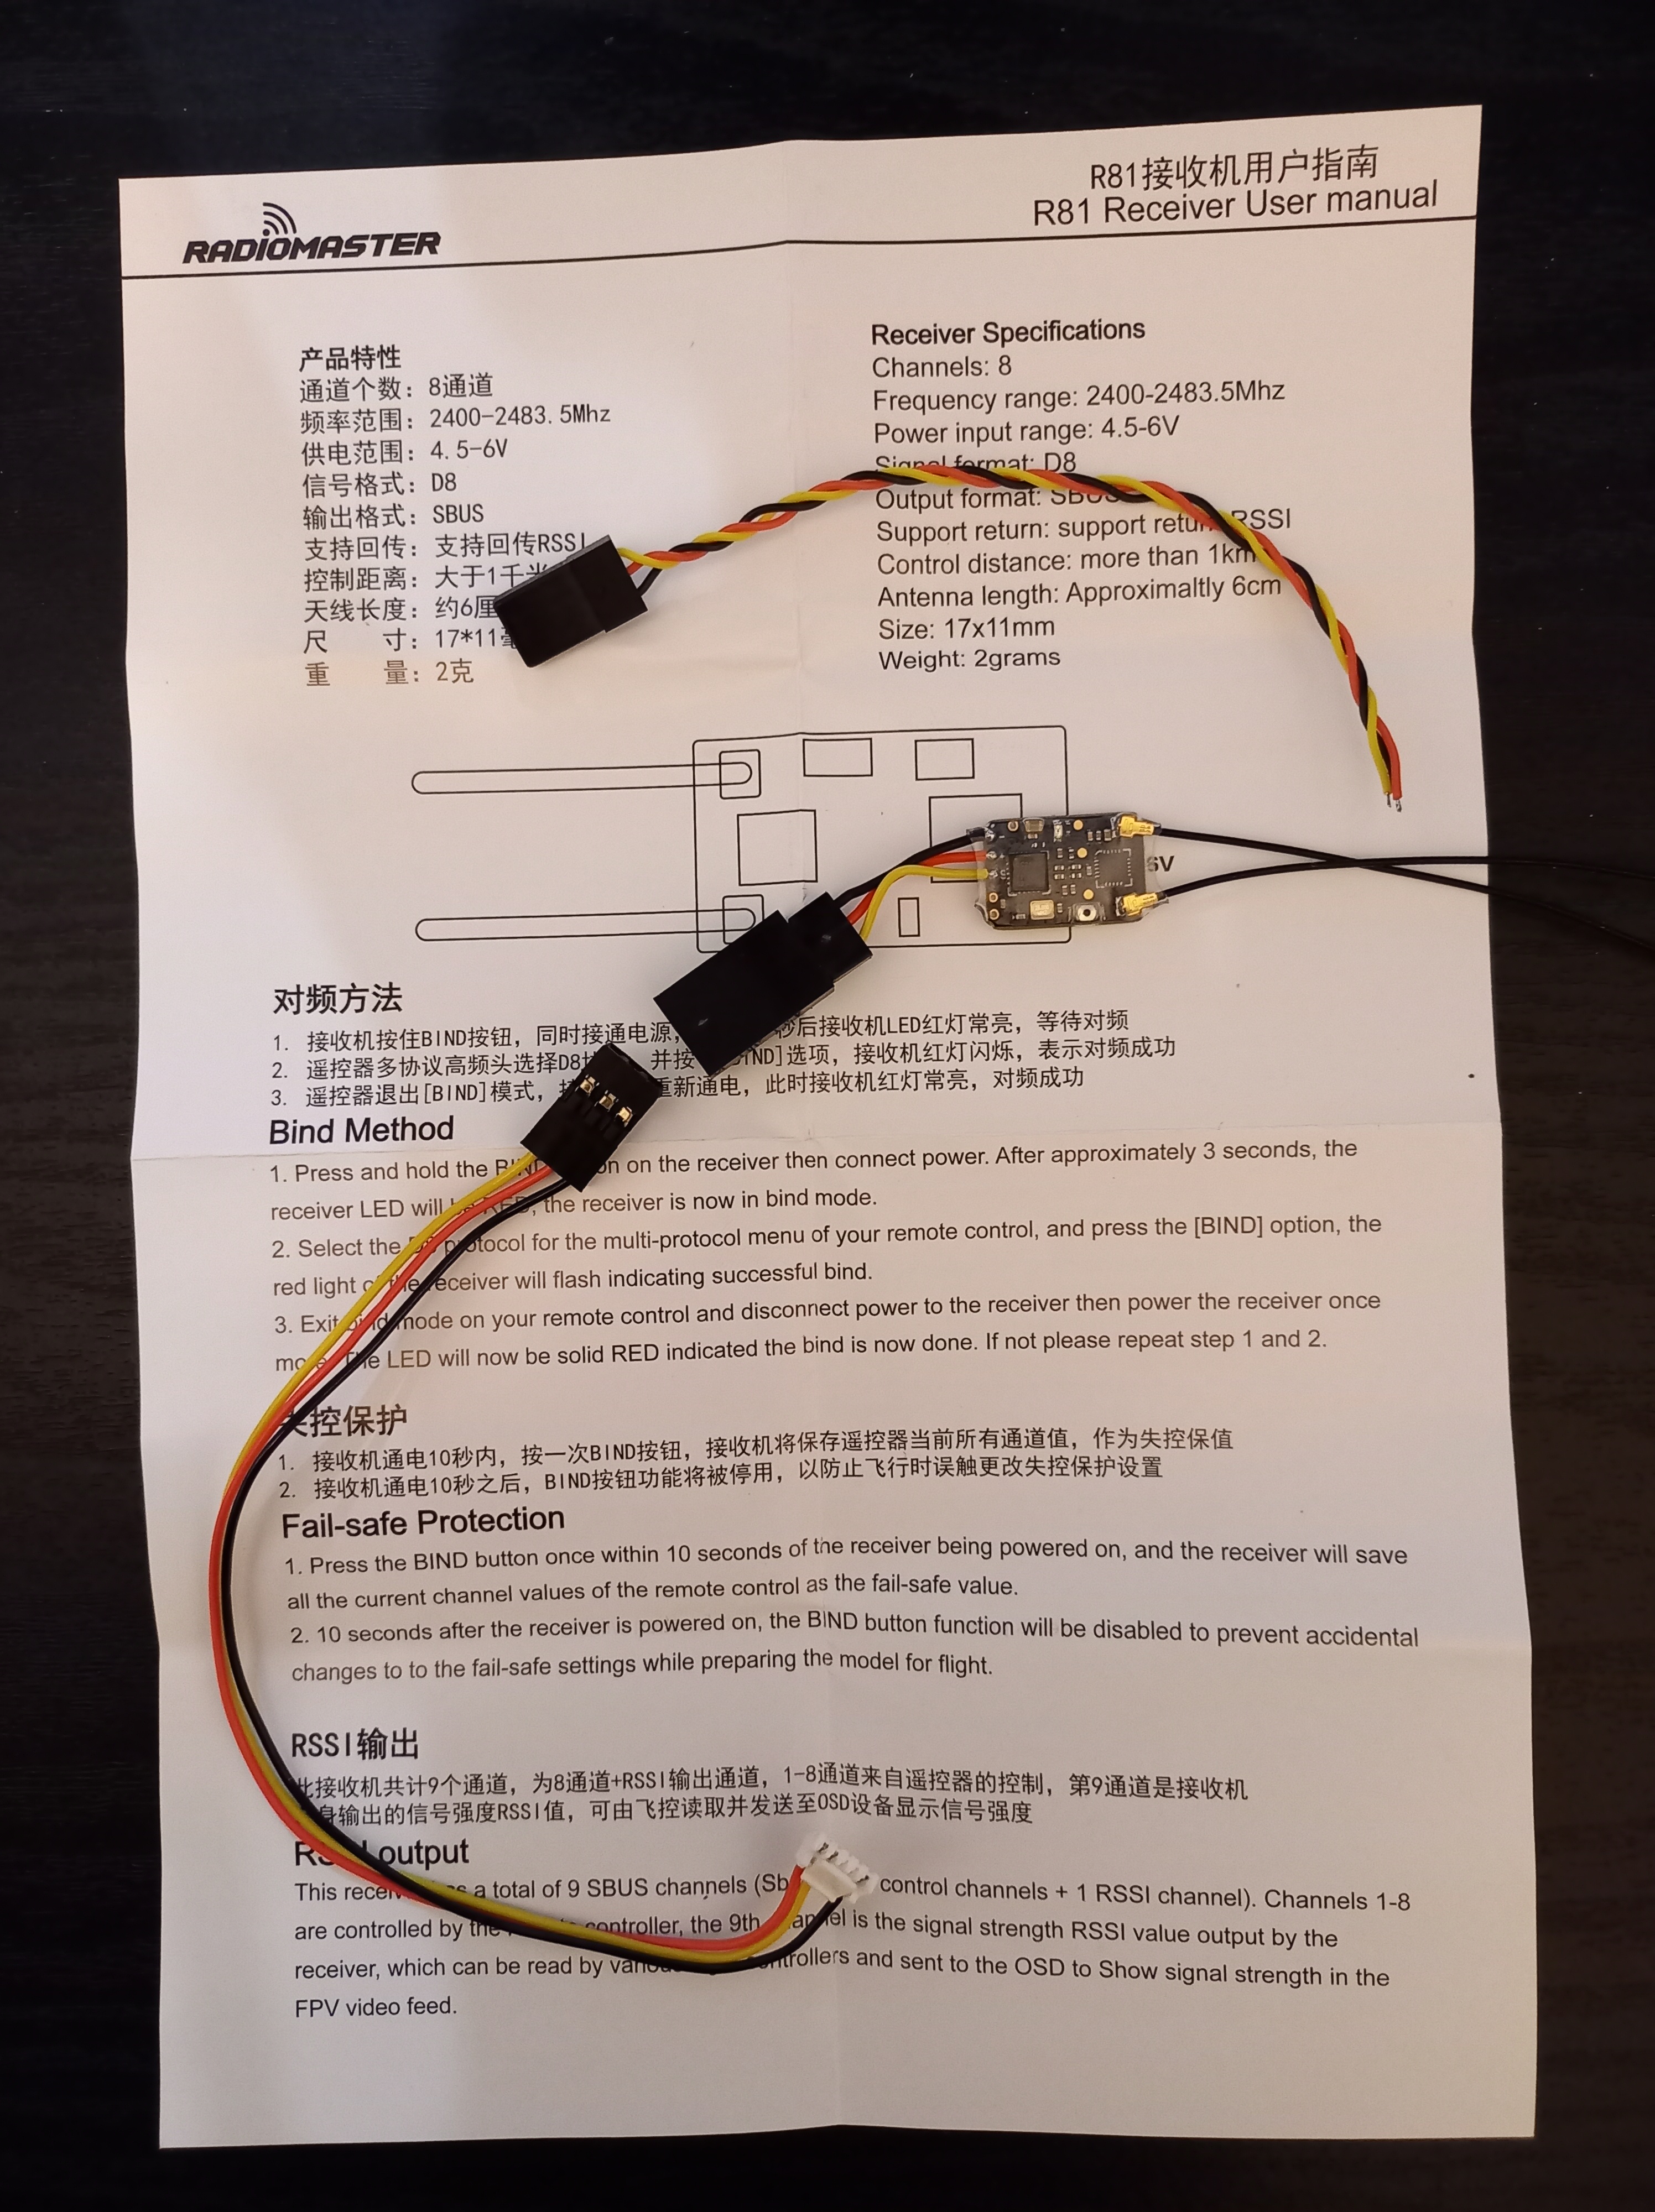
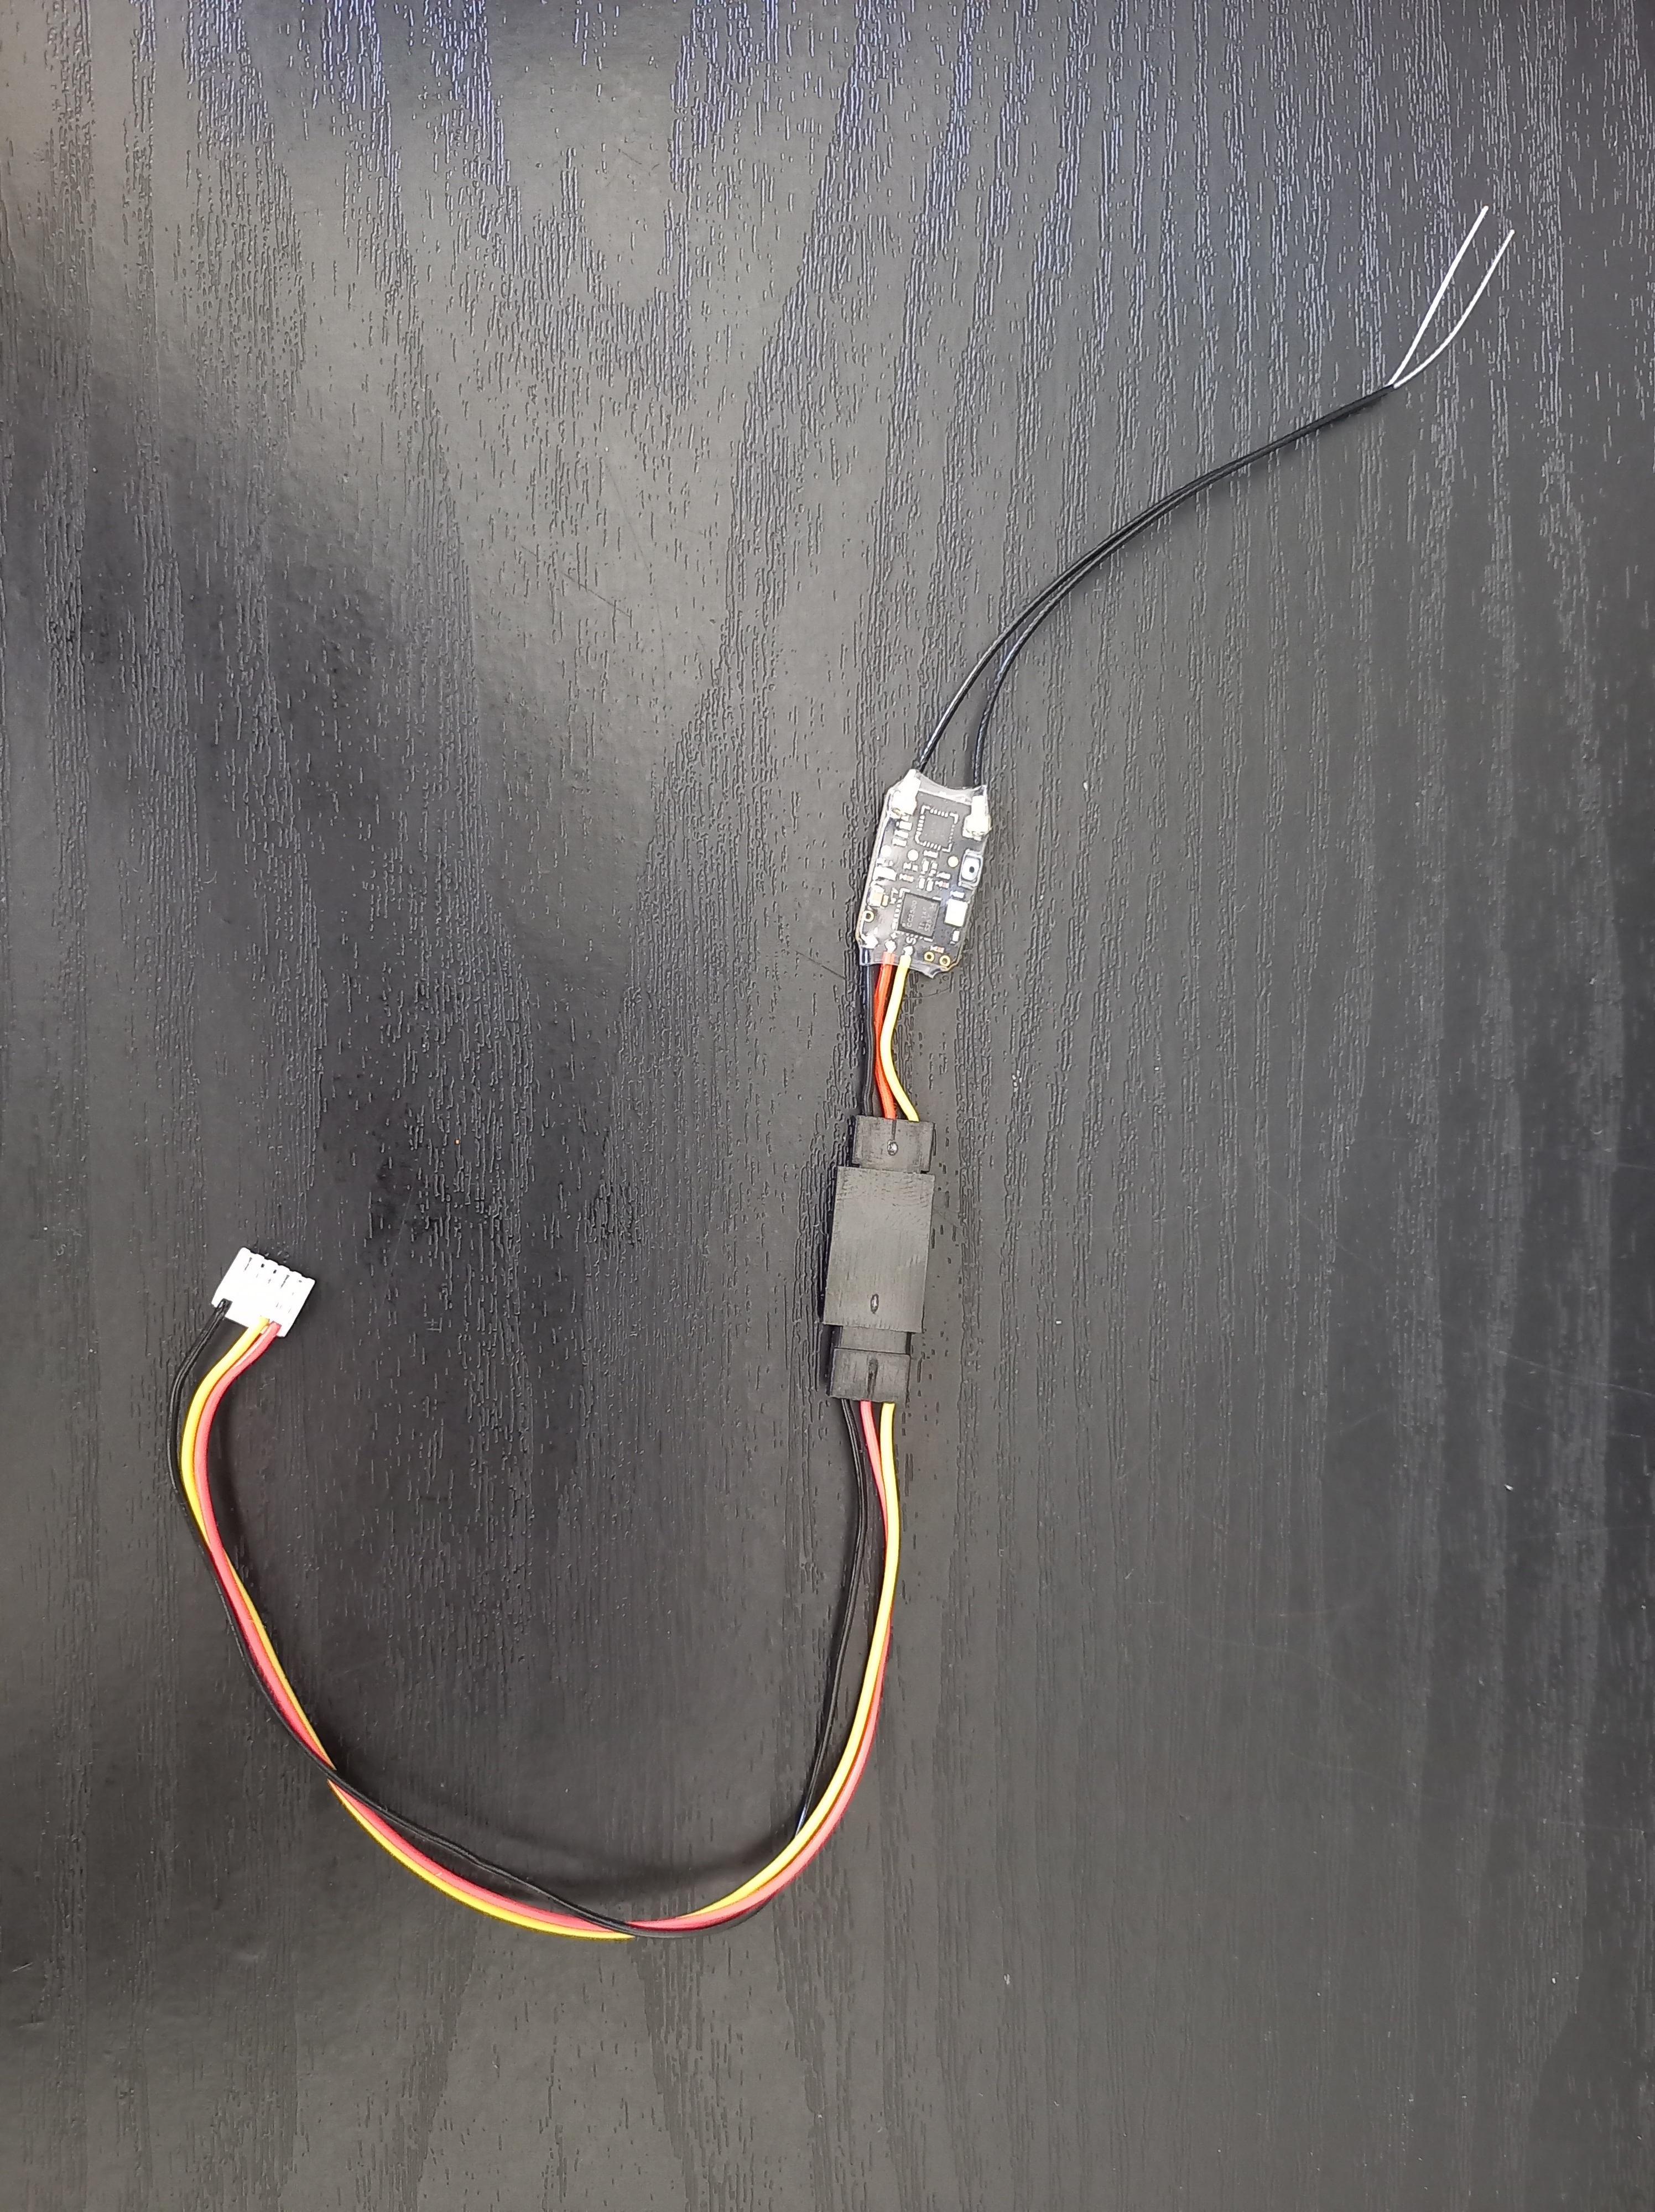
The RadioMaster R81 receiver uses the Frsky D8 Compatible signal format. The R81 D8 protocol receiver connects to the PPM/SBUS RC port of the Pixhawk 6C flight controller as shown in the images below.
A transmitter/receiver pair for a quadcopter must necessarily have at least four channels to support thrust, roll, pitch and yaw commands. Using the mode 2 setup, the controls would be as per the image below (taken from the PX4 user guide).

Typically, more channels are available to activate different flight modes or perform any pre-programmed actions.
Binding
Binding a radio transmitter/receiver pair establishes communication between the quadcopter and RC controller for manual flight. The bind procedure for the R81 receiver with the RadioMaster TX16S transmitter can be somewhat tricky to get right. A good overview of the binding process can be found here. The LED should be a steady red colour when binding is successful.
The R81 receiver requires frequency tuning to find the optimal flying frequency. The frequency tuning process is demonstrated in this video. Following this procedure, I recorded TUNE_MIN = -51, TUNE_MAX=21 and TUNE_MEDIAN=-15 and set the RF Freq fine tune parameter on the RadioMaster TX16S to -15. During the fine tuning process, the RSSI value drops to 0db whenever the signal is lost. Make sure that there is some distance between the receiver, transmitter and your body when performing this tuning process. Don’t forget to re-bind the receiver after frequency tuning.
Once the setup completes, the quadcopter receiver should automatically bind to the RadioMaster TX16S transmitter when both are turned on and within range.
Telemetry
QGroundControl (QGC) is open source flight control and mission planning software from Dronecode Foundation. Connecting the telemetry radios to the quadcopter and a laptop running QGC software establishes communication with the ground station. The connection is plug and play (green solid LED confirms the connection is established) providing wireless connection to the Pixhawk flight controller (instead of using a USB cable).
In QGC enable the telemetry by setting the TEL_FRSKY_CONFIG parameter to 101 (TELEM1) which corresponds to the physical port on the Pixhawk 6C flight controller.
It is possible to access quadcopter flight information (eg. flight mode, battery level), transferred via FrySky telemetry, on the RadioMaster TX16S transmitter display screen interface. The process involves a few simple steps:
- Turn on the quadcopter and Radiomaster TX16S transmitter and wait for the bind process to complete.
- Click the MDL button then navigate to the TELEMETRY page. Click on “Discover new” in the Sensors section to see all of the telemetry information available from the flight controller.
- To display telemetry data on the RadioMaster TX16S homescreen click the TELE button. Select a layout then click Setup widgets. In each block select the appropriate widget. The telemetry data is available from the value screen. Similarly, complete the top bar setup. The steps are summarised in this video tutorial.
Configuration with QGC
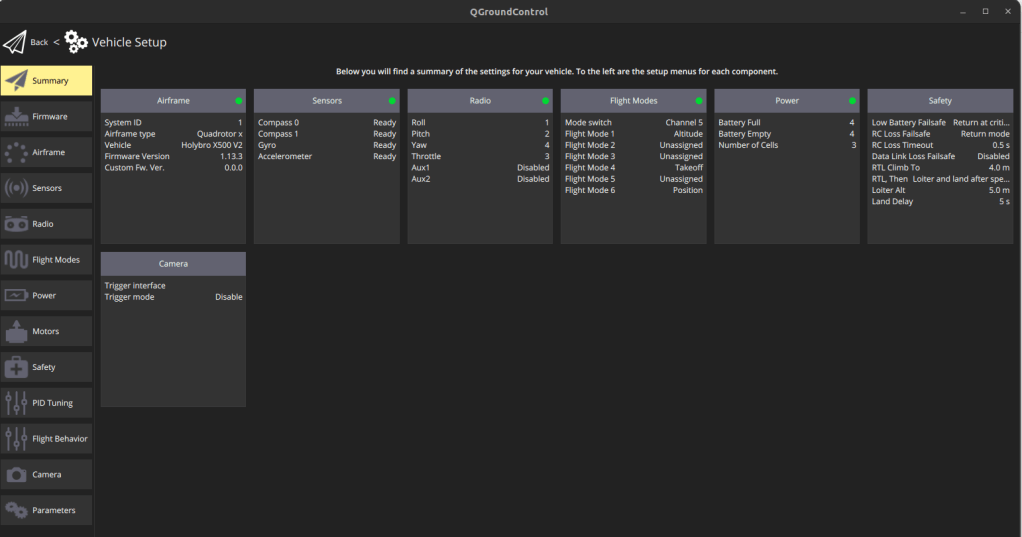
Before connecting the battery and flying the quadcopter, a basic hardware configuration using the QGroundControl (QGC) software is required. The figure below shows what the QGC screen should look like once all configurations are completed.
Begin by installing the latest firmware onto the Pixhawk 6C flight controller (using the USB connection to a laptop) then set the Airframe to “Holybro X500 V2” under the Quadrotor picture dropdown menu.
Sensor calibration
Perform all the sensor calibration steps far from metal objects (office desk etc.) or large magnetic fields to avoid any interference.
Flight mode selection
PX4 supports multiple flights modes for both manual and autonomous control. Flight modes are a type of shared control where the autopilot compensates the output trajectory for erratic user input or environmental factors. Each flight mode implements a specific shared control objective such as staying on course (despite windy conditions) or maintaining a set altitude. Manual/Stabilised mode is useful for observing how the quadcopter flies natively, without any shared control compensation. The added advantage is that – should something go wrong – the pilot can just center the roll and pitch stick to hover at a set altitude thus affording her precious time to hopefully regain control.
As a first time pilot, use Position Mode . Offboard Mode is useful if flight commands are coming from a companion board (for example a Raspberry Pi running ROS sending commands to the flight controller via MAVSDK, ROS 1 or ROS 2).
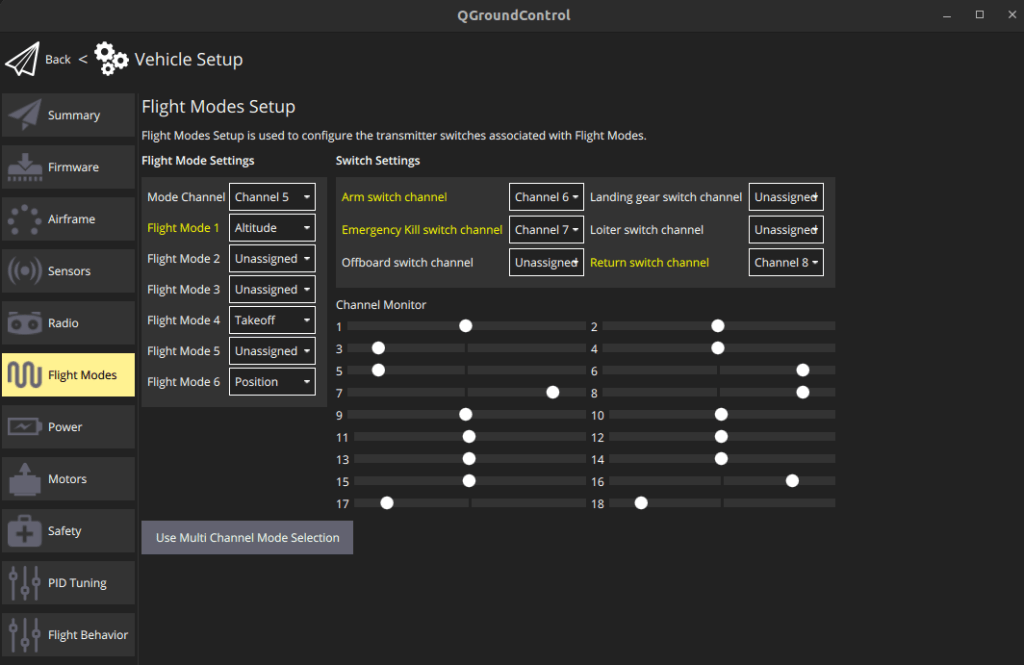
Autonomous Flight modes, such as takeoff and landing can be mapped to switches on the RadioMaster TX16S transmitter. Similarly, manual flight modes such as Position or Altitude can also be mapped. Begin by mapping the 3 way switch labeled SD to channel 5 (CH5). Edge TX is not particular about channel number or order so a channel may be mapped to any switch by clicking the MDL button then navigating to the MIXES page. The default setting on the Quad model for the RadioMaster TX16S assigned SF switch to channel 5 so this needs to be changed to the SD switch. Channel mapping is covered in this useful tutorial.
The R81 receiver only supports 8 channels. The flight modes and switch settings can therefore be mapped to up to 8 channels. On QGC and on the RadioMaster TX16S:
- Flight mode: Map Altitude Mode (stabilises the altitude), Takeoff Mode (takeoff and hover at specific height), and Position Mode (activates manual intuitive flying) to channel 5 which is controlled by the SD switch on the transmitter.
- Switch: Map channel 6 to SF arm switch (spins propellers to get ready for takeoff), channel 7 to SE emergency kill switch (stops motors to crash land), and channel 8 to SG return switch (return and land at start position).
For autonomous flight via MAVLink commands you can also map a channel of your choice to an offboard switch.
Don’t forget to test every switch to make sure that the correct mappings are highlighted as shown in the image below.
An alternative to setting an arm switch, as above, is to use the default arming gesture. Assuming a mode 2 setup RC transmitter, the platform is armed or disarmed by moving the left RC throttle/yaw stick to the bottom right or left corner and holding in place for 1 second respectively. An armed quadcopter (dangerous) is fully powered with working motors and propellers. A disarmed quadcopter (safe) does not provide any power to motors or actuators.
Battery calibration and safety
LiPo battery cells should not discharge below 3.8V. To avoid deep discharge, which damages the battery cells, it is important to calibrate the battery. Recommended settings are 4.05V/cell (full capacity) and 3.5V/cell (empty capacity). Measuring current at load is tricky since the XT60 connector from the battery is on the ESC board which is between two plates on the PX4 development kit making access very difficult. I skipped the battery calibration step as the instructions were somewhat difficult to follow.
Failsafes are actions that are triggered by certain areas or conditions which would make continued flying unsafe. The failsafe state machine simulation allows you to easily simulate what actions will be taken for a given set of states, conditions and parameters. Setup failsafes that are appropriate for your specific use case or test scenario.
Test flight
The first step before attempting a test flight is to carefully read the first flight guidelines . Find a secluded open space with no wind, electric pylons, telephone lines, trees, animals, people, buildings or other obstacles nearby. Connect the telemetry radio to the ground station laptop, connect the (fully charged) battery and propellers to the quadcopter, turn off the safety switch on the M8N GPU unit, and turn on the RadioMaster TX16S transmitter. Wait a minute or so for the GPS to lock and for all radio communications to be established.
The PX4 development kit is now ready for its first manual test flight!
Attempt to arm the quadcopter by flipping the SF switch or by pressing the Arm button on QGC. The propellers should begin spinning if the pre-flight checks pass. Ensure Position mode is selected before engaging takeoff. Practice takeoff and landing, using the emergency stop switch, and turning in different directions. It takes a while to gain confidence flying but Position mode shared control compensation makes the experience more enjoyable and less frightening.
Auto-tuning controllers
Auto-tuning performs real-time tuning of the PX4 rate and attitude PID controllers. This process takes only a few seconds and is performed during flight.
After testing the controls of the Radiomaster TX16S, perform the pre-tuning tests on the quadcopter. The QGC software automatically changes flight modes so rather take off manually by centering the Throttle stick, arming the quadcopter then engaging the SD switch to Takeoff mode (the quadcopter will rise to an altitude specified by the MIS_TAKEOFF_ALT parameter). After takeoff hover for a few seconds then switch to Altitude or Position mode. During flight perform the auto-tuning steps using the QGC software then land and disarm the quadcopter to apply the new tuning parameters.
The auto-tuning steps were performed in Position mode because Altitude mode proved to be very unstable during testing. Merely switching into this mode causes the quadcopter to suddenly accelerate forward (even without wind) as shown in the video below. It is unclear what is causing this momentum.
Crashing or loosing control
When learning to fly, considerable care should be taken. Loosing or crashing a quadcopter is surprisingly easy to do. Make sure to take off on a flat surface and hover the quadcopter for a minute or two before flying, to warm up the battery and check that all is well before proceeding.
If you do crash, wipe your tears and check the quadcopter for:
- physical damage (cracks, bends)
- propeller chips, cracks or dents
- disconnected or burnt wires
- loose fittings (including motors and landing pads)
- flight logs to see what might have caused the crash if it’s not a pilot error
Hold mode is especially useful for pausing a mission and regaining control of a quadcopter in an emergency situation. A switch can be programmed to enter hold mode, or this can be included as part of the failsafe pre-actions. If the situation is dire, use the emergency kill switch to cut power to the motors to safely crash the quadcopter.
Read the docs
The PX4 User Guide is an excellent starting point for understanding the professional autopilot for operating drones. The Getting Started section is a must read for first time drone users. The QGroundControl User Guide is a comprehensive reference for the software which supplements the autopilot user guide.
Troubleshooting
Problem 1: the Holybro X500 V2 model is not listed in the Airframes on QGC as shown in the screenshot below.

Solution 1: restart your laptop, reconnect the Pixhawk via USB and run the QGC software. The model should be available under Quadrotor now.
Problem 2: the yaw stick is not detected by QGC as shown in the configuration image below.
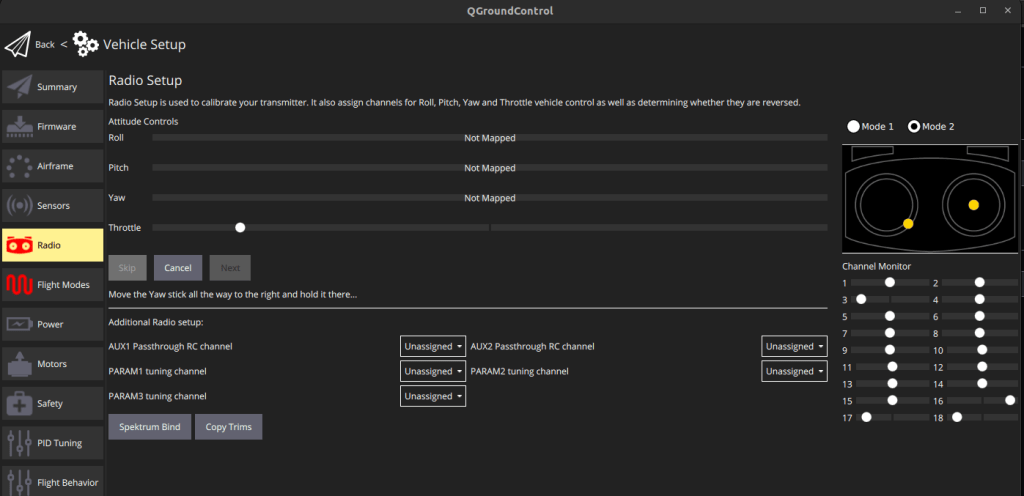
Solution 2: This is a straightforward calibration issue. Follow the initial setup steps from this tutorial (excluding the model setup section). The RadioMaster TX16S comes with a Quad model for quadcopter airframes. This can be selected by pressing down on the roller, clicking on Select Model and selecting the Quad model from the list of templates.
Problem 3: cannot arm the vehicle, getting the error “arming denied, avoidance system not ready.”
Solution 3: the PX4 development kit does not come with any sensors installed for obstacle avoidance (no camera, lidar, sonar, radar etc.) however this is enabled by default on QGC. Running obstacle avoidance typically requires a companion computer which runs a vision based algorithm to detect obstacles. To get rid of this error, disable the COM_OBS_AVOID parameter in QGC. The Fly View will change to “Ready to Fly”.
Problem 4: WiFi on the laptop drops when the RadioMaster TX16S is turned on.
Solution 4: this happens because the RadioMaster TX16S interferes with the 2.4GHz Wifi frequency band.
Next steps
This article focused on setting up the Holybro PX4 development kit for manual flight and testing. Future articles will describe how to integrate a simulation environment, perception sensors, and ROS for a full robotics development setup.

One thought on “Open Source drone development”