Open source autonomous driving projects have simplified autonomous vehicle development, particularly where resources are constrained. Popular projects include Apollo (an open autonomous driving platform), openpilot (an open source driver assistance system), CARLA (an open source simulator for autonomous driving research) and Autoware.Auto (an open source autonomous driving platform). This article focuses on setting up a development environment for the ROS 2 based Autoware.Auto software stack.
Autoware.Auto is built on top of ROS 2 which is the new improved Robot Operating System. Autoware.Auto is open source autonomous diving built for both simulation and real-world deployment. The code base is designed to offer safety, code quality, modularity and static memory allocation. The Autoware.Auto software is used in academia and industry as a base for developing and deploying autonomous driving features such as mapping, localisation, path planning, object detection and tracking, as well as the vehicle interface layer.
This tutorial focuses on installing Autoware.Auto on your machine (this could be your laptop, remote desktop or even the main computer on an autonomous vehicle) with Agile Development Environment (ADE). The only requirements are Ubuntu 20.04.2 LTS, Docker, ADE, and the nvidia container toolkit (only if you’re using an NVIDIA graphics card) installed on the host computer.
What is ADE?
Docker allows developers to work within a common consistent development environment by leveraging OS-level virtualisation. Docker allows you to bundle all your application code, support binaries, libraries and configuration files together into an Image. Images can then be deployed inside containers which are isolated from one another. This setup uses less resources than virtual machines because the containers share the services of a single operating system kernel. Docker allows you to build, ship and run Images with ease.
ADE is a Docker-based tool that creates a Docker container from a base Image and also mounts additional read-only volumes. For the Autoware.Auto case, ADE launches several Docker images including SVL (simulation), ROS 2 (robotics middleware), and ROS2NativeBridge (simulation integration). It is possible to add a volume (say for PyTorch) using the .aderc configuration file. Alternatively, you could modify the base Image to include additional libraries etc. and build this new Image. Base Images (for example running different versions of ROS 2) can easily be selected with the .aderc config file. With ADE you can mount volumes (libraries etc.) and switch between different versions of these volumes without affecting other parts of the environment.
Setting up Autoware.Auto
The best way to start making changes or contributions to Autoware.Auto is to create a fork of Autoware.Auto. Then create a branch (not master) and push changes to that branch on your fork. The .aderc config file on your branch can be modified to your liking.
When changes are made upstream, obtain these changes by simply updating the master fork of your branch and rebase your branch with your fork’s master. The “how to develop in a fork” tutorial provides detailed instructions on how to work with fork-and-pull with Autoware.Auto.
Install Docker
Installing Docker is straightforward:
- Install the latest version of Docker for Ubuntu following these instructions.
- Follow the post-installation steps for Linux. Importantly, make sure you are added to the docker group using this command:
sudo usermod -aG docker $USER
Install nvidia-container toolkit
Before installing the nvidia-container toolkit, make sure that NVIDIA drivers are installed:
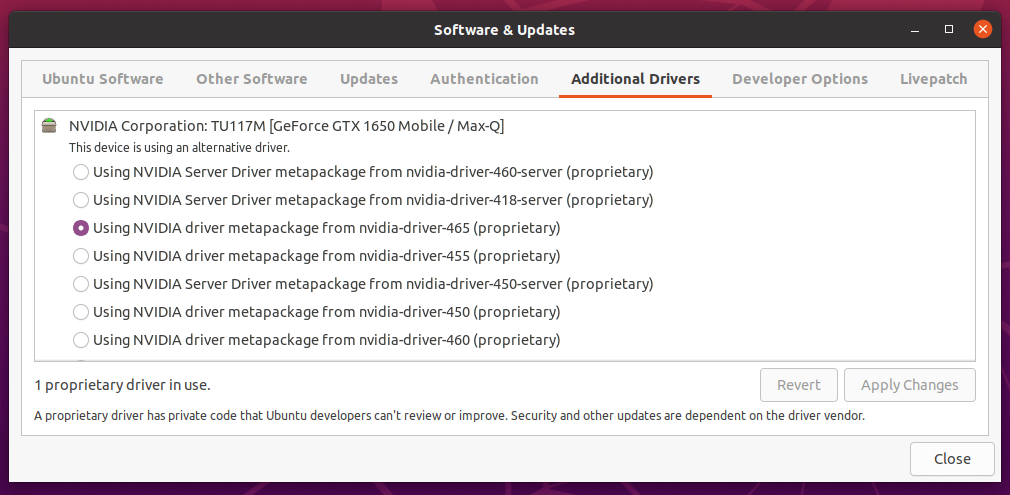
- To install NVIDIA drivers via a GUI, open Software & Updates > Additional Drivers then select the appropriate driver as shown below. Restart your computer.
- Alternatively, the driver can be installed via terminal using the following commands
- Add the NVIDIA repository:
sudo add-apt-repository ppa:graphics-drivers/ppathensudo apt-get update
- Install the NVIDIA driver:
sudo apt-get install nvidia-driver-465 - Install the NVIDIA driver utilities:
sudo apt install nvidia-utils-465 - Restart the computer and disable secure boot in BIOS to allow the driver to be loaded
- Run
nvidia-smito check the installation
- Add the NVIDIA repository:
- Optionally, run the post-installation actions described here.
- Finally, install the Nvidia container toolkit:
The CUDA driver is installed on the host OS and the CUDA toolkit is installed inside each Docker container.
Follow these instructions to install the toolkit in Docker.
Install ADE
To install ADE, run these commands in terminal:
- Download the latest ade+x86_64 statically linked binary file from the Releases page.
- To make ADE available globally the commands must be run from /usr/local/bin directory:
cd /usr/local/bin - Move and rename the downloaded binary file:
sudo mv ~/Downloads/ade+x86_64 ade - Change permissions of the binary file:
chmod +x ade - Run
./ade --version 4.3.0(specify the version you downloaded) - Update ade:
./ade update-cli - Check the latest version is installed:
./ade --version
ADE can be updated by simply running ade update-cli. To check that ade is installed correctly, run which ade and ade --version commands. The output should be the directory where ADE is installed and the latest version number respectively.
Install Autoware.Auto
After installing the prerequisites above, Autoware.Auto can be installed by following these instructions. Note that these instructions assume that you clone and checkout the Autoware.Auto repository directly. To work from a fork (preferred method), follow the “how to develop in a fork” tutorial.
Troubleshooting
nvcc --version is not working after installing CUDA Toolkit
The solution is to add the paths to your ~/.bashrc file:
export PATH="/usr/local/cuda-11.4/bin:$PATH"
export LD_LIBRARY_PATH="/usr/local/cuda-11.4/lib64:$LD_LIBRARY_PATH"
Then run source ~/.bashrc in terminal. Now the command should be working fine.
ade start --update --enter produces a permission denied error
This is a Docker error. The solution is to add the user to the docker group using this command: sudo usermod -aG docker $USER

One thought on “Step-by-step Autoware.Auto installation guide”