The Intel RealSense D435 is the latest RGBD camera available from Intel, and is an upgrade from the Intel R200 camera already discussed in a previous post. The D435 is a stereo depth camera that is designed to work both indoors and outdoors. The 3D reconstruction is constructed using active Infrared (IR) stereo. The camera is very affordable and can be purchased here.

The Intel RealSense D435 RGB-Depth camera
Setting up the camera
The initial setup installs the RealSense viewer application which lets you inspect all the modalities of the camera (infrared image, RGB image, stereo 3D reconstruction) and allows you to adjust the camera parameters.
- Install the RealSense SDK 2.0 which includes Debian packages and the RealSense viewer.
- Follow the instructions on the Linux distribution page. Before proceeding, make sure that your kernel is supported (type
uname -rinto terminal to check the kernel version). Also make sure that you install the developer packages librealsense2-dev and librealsense2-dbg. The dev packages allow you to compile applications with librealsense:g++ -std=c++11 filename.cpp -lrealsense2
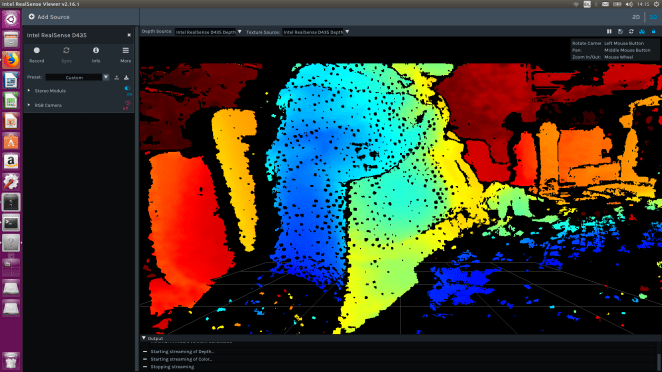
A 3D reconstruction from the RealSense D435 in realsense-viewer.
Integrating the camera with ROS
A summary of using the RealSense with ROS can be found on the official ROS RealSense Wiki page.
- Install the librealsense2 (already installed in the step above) and realsense2_camera ROS packages. The package realsense2_camera contains a node to publish data from the various camera streams.
- Create and build a ROS workspace in which to house a robotics project:
- Create the directory:
mkdir -p ~/robot_ws/src cd ~/robot_ws/src- Initialise the workspace using:
catkin_init_workspace. This creates, amongst other things, a CMakeLists.txt file in your src directory. - Build the empty project:
cd ~/robot_wsfollowed bycatkin_make. There should now be automatically created build and devel directories in your workspace. - Setup your ROS setup.bash to execute each time you open a terminal window by typing in terminal:
echo "source ~/robot_ws/devel/setup.bash" >> ~/.bashrc - Update bashrc:
source ~/.bashrc
- Create the directory:
- Install the ros-kinetic packages required for image processing using terminal:
sudo apt-get install ros-kinetic-cv-bridge -ysudo apt-get install ros-kinetic-image-transportsudo apt-get install ros-kinetic-tf -ysudo apt-get install ros-kinetic-diagnostic-updater -ysource ~/.bashrc
- Clone the ROS Wrapper 2.0 for Intel RealSense from Github and install it into your workspace:
cd ~/robot_ws/srcgit clone -b development https://github.com/intel-ros/realsense.gitcd ~/robot_wsthen build the workspace usingcatkin_make.
At this point you have a RealSense node that can publish camera data in ROS! The next step is to test this setup by running the node and visualising the output.
Running the camera in ROS
As a first test, download the outdoors bagfile from Intel and run their python script (don’t worry too much if this fails):
- Download the ROS bagfile:
- Name the file:
bag_filename="http://realsense-hw-public.s3.amazonaws.com/rs-tests/TestData/outdoors.bag"; - Download the data:
wget $bag_filename -P "records/"
- Name the file:
- Run
python src/realsense/realsense2_camera/scripts/rs2_test.py --all
Next we can run RealSense ROS nodes and visualize them in RViz, inspect the topics being published and play around with different paramater settings. First install the RGBD launch package using: sudo apt-get install ros-kinetic-rgbd-launch.
To start the camera node simply run the appropriate launch file. For example, running: roslaunch realsense2_camera rs_camera.launch will publish all the camera streams (infrared left and right, depth, color), the camera extrinsic between different streams, tf transforms, and static camera intrinsics.
To publish an RGBD point cloud using aligned depth topic type: roslaunch realsense2_camera rs_rgbd.launch.
Follow the Usage Instructions section of this guide for further examples. Play around with the different launch files to get a feel of what topics are available.
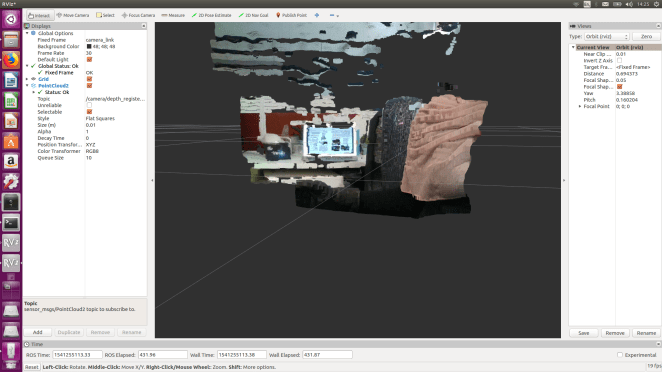
An RViz visualization of the coloured 3D point cloud from the depth ROS topic.
Camera parameter setting
To test different camera parameters (depth gain, autoexposure, contrast, brightness, gamma etc.) dynamically:
- Run a node to publish data, such as:
roslaunch realsense2_camera rs_aligned_depth.launch - Run rqt_reconfigure node:
rosrun rqt_reconfigure rqt_reconfigure - Display the camera stream in Rviz:
rosrun rviz rviz - Now open an image topic such as /camera/color/image_raw and play with the sliders in the rqt_reconfigure GUI. The result can of course be visualized in Rviz.
It is possible to activate RealSense filters by providing arguments to the roslaunch call. For example: roslaunch realsense2_camera rs_camera.launch filters:=temporal,spacial,pointcloud will enable the temporal, spacial and pointcloud filters. To enable hardware registration the align_depth parameter can be set to true: roslaunch realsense2_camera rs_rgbd.launch align_depth:=true.
Finally, the resolution of the camera streams can also be changed within a launch file. This could be changed from 640×480 to 1280×720 for example.
Interestingly, the RealSense D435 appears to have a built in IMU including a gyroscope and accelerometer however this data is not directly accessible via a ROS topic.

3 thoughts on “Integrating the Intel RealSense D435 with ROS”